在 Zynq MPSoC上运行 Doom 游戏
时间:08-02
来源:互联网
点击:
Buildroot
Buildroot 是一个简单的构建系统,用于为 Linux 系统创建 rootFS。它使用 make menuconfig 接口,这是一个用来配置 Linux 内核本身的常用方法。Buildroot 包含对 PrBoom 的默认支持,这对于本演示很有帮助。(PrBoom 是我们所使用的 Doom 游戏的 GNU 通用公共许可证 [GPL] 版本。这里我们会穿插使用 PrBoom 和 Doom 这两个术语。 )Buildroot 对 Xen 构建不提供本地支持(尽管它可创建用于构建 Xen 所需的所有库和工具链),因此赛灵思提供 Xen、Xen 工具和为用户预编译的 Xen 库以及其他一些所需的库,以让过程简单直观。
PetaLinux
PetaLinux 工具包含一个命令集,以便让用户在赛灵思 FPGA 和 SoC 上轻松创建和扩展 Linux 系统。该演示使用 petalinux-build 和 petalinux-boot 命令。petalinux-build 命令用于创建全部所需的组件。petalinux-boot 命令(外加几个变量)用于启动在 QEMU 仿真器上运行的所有组件。介绍 PetaLinux 工具中的所有命令超出了本文的范围,但是通过此演示系统应该很容易发掘这两个命令和其他命令的功能。参考PetaLinux 工具文档 — 参考指南 UG1144 (v2015.4) 了解更多信息。
项目先决条件
该项目需要一个运行 Linux 的工作站或虚拟机,具有满足 UG1144 (v2015.4) 中所列的 PetaLinux 工具安装要求的环境,而且环境中需要安装赛灵思 PetaLinux Tools v2015.4 版本。
步骤 1:构建 ROOTFS
首先,我们需要构建 rootFS。从赛灵思下载 doom_demo.tar.gz,打开下载目录中的一个 terminal;你可在以下网址中找到全部所需文件: www.wiki.xilinx.com/Doom+on+Xen+Demo。我们将该目录称为 <down_dir>。
解压文档。
$ cd <down_dir>
$ tar -xzf doom_demo.tar.gz && cd doom_demo
我们会看到一个文件夹,我们将把它存到根文件系统(一个用于 Dom0,另一个用于 DomU)。现在,我们需要构建 PrBoom,并复制到 rootFS。
首先,需要下载 Linux 内核,这样我们随后就可以构建 rootFS。我们使用 v4.3 标签。
$ git clone -b v4.3 https://github.com/tor- valds/linux.git
下载 Buildroot 源文件,并更改到 Buildroot 目录。
$ git clone https://git.buildroot.net/buildroot
&& cd buildroot
现在我们需要配置 Buildroot,以构建可以使用的套件。
$ make menuconfig
我们选择以下选项:
Target options ---> Target Architecture ---> AArch64 (little endian)
Target packages —> Games ---> prboom --->
Target packages —> Games ---> shareware Doom WAD file --->
应自动选择全部所需的库。
$ make # (这需要几分钟时间,取决于机器。)
现在,我们将所有 PrBoom 相关文件复制到 targetfs 目录,确保我们在 buildroot 目录下的 ./output/
target/ 目录。
$ for i in $(find ./-name ‘*oom*’); do cp ${i}
<down_dir>/doom_demo/targetfs/${i}; done
现在,我们完成了 Buildroot 操作。我们移到上一个目录 doom_demo 目录。
$ make # Build the host and guest rootFS.(这需要几分钟时间,取决于你的机器。)
注意:可能还存在额外配置选项,这主要取决于使用的内核版本。这些额外配置选项未被我们提供的配置预先选择。使用默认选项即可(需点击回车键)。
步骤 2:构建基础设置
接下来,我们为平台构建嵌入式系统软件的剩余部分,包括引导装载程序、ARM Trusted Firmware (ATF)、Linux 内核和设备树。赛灵思的 PetaLinux 工具让这个过程简单直观。我们创建一个针对赛灵思 ZCU102 开发板的 PetaLinux 项目。参考 2015.4 UG1144 和 AR#66249 中 QEMU 和 MPSoC PetaLinux 的快速入门材料。访问china.xilinx.com ,将 ZCU102 BSP (板支持包)下载到 <petalinux_bsp_dir> 目录下。
$ cd <down_dir>
$ petalinux-create --type project -s <petali- nux_bsp_dir>/ Xilinx-ZCU102-v2015.4-final.bsp
--name doom_demo_zynqMP
这样将在 <down_ dir>/doom_demo_zynqMP 中创建我们的 PetaLinux 项目。
我们转到 PetaLinux 项目,并构建 PetaLinux。
$ cd <down_dir>/doom_demo_zynqMP
$ petalinux-build
现在,我们需要为本用例手动编辑设备树。
编辑 xen-overlay.dtsi 文件 (subsystems/linux/ configs/device-tree/xen-overlay.dtsi)。
将 dom0 下的
‘reg = <0x0 0x80000 0x3100000>;’
替换为
‘reg = <0x0 0x80000 0x4100000>;’
将 dom0 下的
‘xen,xen-bootargs = “console=dtuart dtuart=serial0 dom0_mem=512M bootscrub=0 maxcpus=1 time r_ slop=0”;’
替换为
‘xen,xen-bootargs = “console=dtuart dtuart=serial0 dom0_mem=512M bootscrub=0 maxcpus=4 timer_ slop=0”;’
将 dom0 下的
‘xen,dom0-bootargs = “console=hvc0 earlycon=xen earlyprintk=xen maxcpus=1”;’
替换为
‘xen,dom0-bootargs = “rdinit=/bin/sh console=hvc0 earlycon=xen earlyprintk=xen maxcpus=4”;’
编辑 zynqmp.dtsi 文件 (subsystems/linux/configs/ device-tree/zynqmp.dtsi)。
将 dom0 下的
‘compatible = “cdns,uart-r1p12”;’替换为
‘compatible = “cdns,uart-r1p8”, “cdns,uart-r1p12”;’ 现在,手动构建 Xen 设备树。
$ dtc -I dts -O dtb -i ./subsystems/linux/con- figs/device-tree/ -o ./images/linux/xen.dtb ./ subsystems/linux/configs/device-tree/xen.dts
最后,我们需要将 Peta- Linux 构建的 rootFS 替换为我们此前构建的 rootFS。之所以这样做,是因为 PetaLinux 不包含 PrBoom,因为我们
提供自己的 rootFS。我们还需要将 xen.ub 镜像替换为赛灵思预先构建的镜像,因为 Xen 和 Xen 工具版本必须匹配。
$ rm <down_dir>/doom_demo_zynqMP/images/linux/ Image && rm <down_dir>/doom_demo_zynqMP/images/ linux/xen.ub
$ cp <down_dir>/doom_demo/Image <down_dir>/doom_ demo_zynqMP/images/linux/Image && cp <down_dir>/ doom_demo/xen.ub <down_dir>/doom_demo_zynqMP/im- ages/linux/xen.ub
使用 u-boot 引导加载程序引导。
$ petalinux-boot --qemu --u-boot --qemuargs=”- net nic -net nic -net nic -net nic -net us- er,net=192.168.129.0,dhcpstart=192.16 8.129.50,host=192.168.129.1,hostfwd=t cp:127.0.0.1:5900-192.168.129.50:5900”
> setenv serverip 192.168.129.1
> tftpb 4000000 xen.dtb; tftpb 0x80000 Image; tftpb 6000000 xen.ub; bootm 6000000 - 4000000
# /boot.sh
# /xen-doom.sh 1
步骤 3:开始演示
现在,我们可以打开虚拟网络计算 (VNC) 查看器,并在运行 QEMU 的机器上连接 localhost:5900 以观看 Doom 游戏。(注意:以上命令行只能重定向 5900 端口,因此当开始演示时只能连接到第一个 Doom 实例。如果想连接多个实例,需要为 QEMU 添加更多 hostfwd 变量,并连接到下个可用的端口[5901 用于下个实例,5902 用于第三个实例,以此类推],然后将这些实例连接。)
一旦 Doom 启动,你就可以使用键盘和鼠标控制游戏。应记住,可能需要点击 ESC 键来开始游戏。还应记住,你已经很长时间没玩 Doom 游戏了,因此你可能走不了多远。别气馁。使用自己构建的系统绝对“可行”。

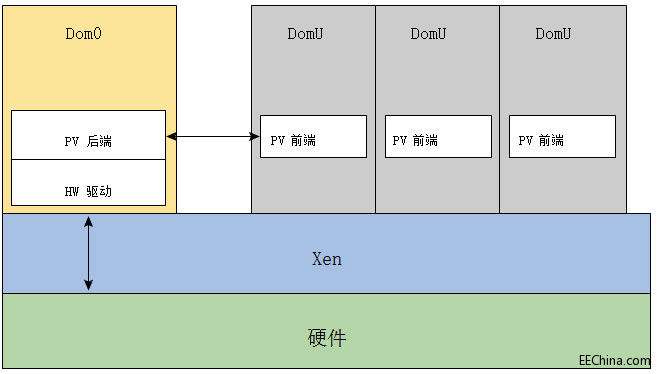
图 4 — 作为 Type 1 管理程序,Xen 在本机硬件上运行,虚拟机在 Xen 之上运行 (来源:“带虚拟化扩展的 Xen ARM” 白皮书)。
Buildroot 是一个简单的构建系统,用于为 Linux 系统创建 rootFS。它使用 make menuconfig 接口,这是一个用来配置 Linux 内核本身的常用方法。Buildroot 包含对 PrBoom 的默认支持,这对于本演示很有帮助。(PrBoom 是我们所使用的 Doom 游戏的 GNU 通用公共许可证 [GPL] 版本。这里我们会穿插使用 PrBoom 和 Doom 这两个术语。 )Buildroot 对 Xen 构建不提供本地支持(尽管它可创建用于构建 Xen 所需的所有库和工具链),因此赛灵思提供 Xen、Xen 工具和为用户预编译的 Xen 库以及其他一些所需的库,以让过程简单直观。
PetaLinux
PetaLinux 工具包含一个命令集,以便让用户在赛灵思 FPGA 和 SoC 上轻松创建和扩展 Linux 系统。该演示使用 petalinux-build 和 petalinux-boot 命令。petalinux-build 命令用于创建全部所需的组件。petalinux-boot 命令(外加几个变量)用于启动在 QEMU 仿真器上运行的所有组件。介绍 PetaLinux 工具中的所有命令超出了本文的范围,但是通过此演示系统应该很容易发掘这两个命令和其他命令的功能。参考PetaLinux 工具文档 — 参考指南 UG1144 (v2015.4) 了解更多信息。
项目先决条件
该项目需要一个运行 Linux 的工作站或虚拟机,具有满足 UG1144 (v2015.4) 中所列的 PetaLinux 工具安装要求的环境,而且环境中需要安装赛灵思 PetaLinux Tools v2015.4 版本。
步骤 1:构建 ROOTFS
首先,我们需要构建 rootFS。从赛灵思下载 doom_demo.tar.gz,打开下载目录中的一个 terminal;你可在以下网址中找到全部所需文件: www.wiki.xilinx.com/Doom+on+Xen+Demo。我们将该目录称为 <down_dir>。
解压文档。
$ cd <down_dir>
$ tar -xzf doom_demo.tar.gz && cd doom_demo
我们会看到一个文件夹,我们将把它存到根文件系统(一个用于 Dom0,另一个用于 DomU)。现在,我们需要构建 PrBoom,并复制到 rootFS。
首先,需要下载 Linux 内核,这样我们随后就可以构建 rootFS。我们使用 v4.3 标签。
$ git clone -b v4.3 https://github.com/tor- valds/linux.git
下载 Buildroot 源文件,并更改到 Buildroot 目录。
$ git clone https://git.buildroot.net/buildroot
&& cd buildroot
现在我们需要配置 Buildroot,以构建可以使用的套件。
$ make menuconfig
我们选择以下选项:
Target options ---> Target Architecture ---> AArch64 (little endian)
Target packages —> Games ---> prboom --->
Target packages —> Games ---> shareware Doom WAD file --->
应自动选择全部所需的库。
$ make # (这需要几分钟时间,取决于机器。)
现在,我们将所有 PrBoom 相关文件复制到 targetfs 目录,确保我们在 buildroot 目录下的 ./output/
target/ 目录。
$ for i in $(find ./-name ‘*oom*’); do cp ${i}
<down_dir>/doom_demo/targetfs/${i}; done
现在,我们完成了 Buildroot 操作。我们移到上一个目录 doom_demo 目录。
$ make # Build the host and guest rootFS.(这需要几分钟时间,取决于你的机器。)
注意:可能还存在额外配置选项,这主要取决于使用的内核版本。这些额外配置选项未被我们提供的配置预先选择。使用默认选项即可(需点击回车键)。
步骤 2:构建基础设置
接下来,我们为平台构建嵌入式系统软件的剩余部分,包括引导装载程序、ARM Trusted Firmware (ATF)、Linux 内核和设备树。赛灵思的 PetaLinux 工具让这个过程简单直观。我们创建一个针对赛灵思 ZCU102 开发板的 PetaLinux 项目。参考 2015.4 UG1144 和 AR#66249 中 QEMU 和 MPSoC PetaLinux 的快速入门材料。访问china.xilinx.com ,将 ZCU102 BSP (板支持包)下载到 <petalinux_bsp_dir> 目录下。
$ cd <down_dir>
$ petalinux-create --type project -s <petali- nux_bsp_dir>/ Xilinx-ZCU102-v2015.4-final.bsp
--name doom_demo_zynqMP
这样将在 <down_ dir>/doom_demo_zynqMP 中创建我们的 PetaLinux 项目。
我们转到 PetaLinux 项目,并构建 PetaLinux。
$ cd <down_dir>/doom_demo_zynqMP
$ petalinux-build
现在,我们需要为本用例手动编辑设备树。
编辑 xen-overlay.dtsi 文件 (subsystems/linux/ configs/device-tree/xen-overlay.dtsi)。
将 dom0 下的
‘reg = <0x0 0x80000 0x3100000>;’
替换为
‘reg = <0x0 0x80000 0x4100000>;’
将 dom0 下的
‘xen,xen-bootargs = “console=dtuart dtuart=serial0 dom0_mem=512M bootscrub=0 maxcpus=1 time r_ slop=0”;’
替换为
‘xen,xen-bootargs = “console=dtuart dtuart=serial0 dom0_mem=512M bootscrub=0 maxcpus=4 timer_ slop=0”;’
将 dom0 下的
‘xen,dom0-bootargs = “console=hvc0 earlycon=xen earlyprintk=xen maxcpus=1”;’
替换为
‘xen,dom0-bootargs = “rdinit=/bin/sh console=hvc0 earlycon=xen earlyprintk=xen maxcpus=4”;’
编辑 zynqmp.dtsi 文件 (subsystems/linux/configs/ device-tree/zynqmp.dtsi)。
将 dom0 下的
‘compatible = “cdns,uart-r1p12”;’替换为
‘compatible = “cdns,uart-r1p8”, “cdns,uart-r1p12”;’ 现在,手动构建 Xen 设备树。
$ dtc -I dts -O dtb -i ./subsystems/linux/con- figs/device-tree/ -o ./images/linux/xen.dtb ./ subsystems/linux/configs/device-tree/xen.dts
最后,我们需要将 Peta- Linux 构建的 rootFS 替换为我们此前构建的 rootFS。之所以这样做,是因为 PetaLinux 不包含 PrBoom,因为我们
提供自己的 rootFS。我们还需要将 xen.ub 镜像替换为赛灵思预先构建的镜像,因为 Xen 和 Xen 工具版本必须匹配。
$ rm <down_dir>/doom_demo_zynqMP/images/linux/ Image && rm <down_dir>/doom_demo_zynqMP/images/ linux/xen.ub
$ cp <down_dir>/doom_demo/Image <down_dir>/doom_ demo_zynqMP/images/linux/Image && cp <down_dir>/ doom_demo/xen.ub <down_dir>/doom_demo_zynqMP/im- ages/linux/xen.ub
使用 u-boot 引导加载程序引导。
$ petalinux-boot --qemu --u-boot --qemuargs=”- net nic -net nic -net nic -net nic -net us- er,net=192.168.129.0,dhcpstart=192.16 8.129.50,host=192.168.129.1,hostfwd=t cp:127.0.0.1:5900-192.168.129.50:5900”
> setenv serverip 192.168.129.1
> tftpb 4000000 xen.dtb; tftpb 0x80000 Image; tftpb 6000000 xen.ub; bootm 6000000 - 4000000
# /boot.sh
# /xen-doom.sh 1
步骤 3:开始演示
现在,我们可以打开虚拟网络计算 (VNC) 查看器,并在运行 QEMU 的机器上连接 localhost:5900 以观看 Doom 游戏。(注意:以上命令行只能重定向 5900 端口,因此当开始演示时只能连接到第一个 Doom 实例。如果想连接多个实例,需要为 QEMU 添加更多 hostfwd 变量,并连接到下个可用的端口[5901 用于下个实例,5902 用于第三个实例,以此类推],然后将这些实例连接。)
一旦 Doom 启动,你就可以使用键盘和鼠标控制游戏。应记住,可能需要点击 ESC 键来开始游戏。还应记住,你已经很长时间没玩 Doom 游戏了,因此你可能走不了多远。别气馁。使用自己构建的系统绝对“可行”。

图 4 — 作为 Type 1 管理程序,Xen 在本机硬件上运行,虚拟机在 Xen 之上运行 (来源:“带虚拟化扩展的 Xen ARM” 白皮书)。
赛灵思 SoC 嵌入式 PSoC 电子 仿真 Linux ARM Cortex 555 FPGA Xilinx 相关文章:
- 赛灵思:可编程逻辑不仅已是大势所趋,而且势不可挡(07-24)
- FPGA可帮助搜索引擎降低功耗和碳排放(09-12)
- 基于Spartan-3A DSP的安全视频分析(05-01)
- 赛灵思新版视频入门套件加快视频开发速度(05-29)
- 赛灵思“授之以渔”理论:危机中如何巧降成本(06-04)
- 赛灵思详解新近推出的FPGA领域设计平台(12-16)
