超实用!Intel伽利略开发板入门指南
upload成功,消息状态栏将显示 Done uploading.
上传成功后, 绿灯 LED 会再板子上闪烁:恭喜您,您已经成功运行一个程序
更多关于 Intel® Galileo, 包括在线社区和支持:
http://www.intel.com/support/galileo
http://communities.intel.com/community/makers
11. 从SD 卡启动开发板 (必须WiFi支持)
遵循如下步骤从SD卡启动板子。 这个设置也允许保存您的sketch到Galileo板子
断电后,它可以重复的执行 sketches(这些步骤创建一个持久的 /sketch 文件夹 和 rootfs.)
备注: 如果你想使用WIFI, 必须遵循这些步骤。因为WIFI驱动文件太大所以Linux image没有包含在
SPI flash中。 Linux SD image 包含在ALSA, V4L2, python, SSH, node.js, and openCV.
所需文件在 LINUX_IMAGE_FOR_SD_Intel_Galileo_v0.7.5.7z 压缩文件中(下载链接请看章节2)。
Note: SD卡必须符合以下要求:
格式化成 FAT 或 FAT32.
SD卡小于 32GB.
1. 拷贝解压文件到SD卡(解压后330M)。如下图,不要更改任何目录

2. 插入SD卡到板子,然后接通电源。
备注: 首先可能花费几分钟时间启动板子。 这是一个预期的行为:由于 SSH 部件在您第一次启动创建了密匙
排故障技巧:您可能需要在SD上增加一个启动分区。 在PC上执行如下步骤
用管理员权限打开 cmd.exe
Run diskpart.exe 运行如下命令
select vol <a> ; (where <a> = the drive letter of the SD card)
clean;
create part primary;
active;
format quick label="BOOTME";
exit
12. 手动更新板子固件 (可选)
备注: 这个方法已经集成在IDE功能中。 仅仅提供参考
You must update the firmware the first time you use the board to ensure the firmware on the board is in sync with the IDE.
These steps assume you have a microSD card inserted into the slot on the board,which contains the release-specific sysimage_nnnn.cap file and the CapsuleApp.efi file.
Caution: The CapsuleApp.efi and the *.cap file are a matched pair and must be used together. When a new *.cap file is released, you must use the corresponding CapsuleApp.efi to install it.
Perform the steps below:
1. Download the SPI flash image capsule files as described in Section 2.
2. Copy CapsuleApp.efi and sysimage_nnnnn.cap to a microSD card and insert it into the slot on the board.
3. Connect the serial cable between the computer and the Galileo board. Set up a serial console session (for example, PuTTY) and connect to the Galileo board’s COM port at 115200($0.1530) baud rate.
4. Configure the serial console session to recognize special characters. For example,if you are using PuTTY, you must explicitly enable special characters. In the PuTTY Configuration options, go to the Terminal > Keyboard category and set the Function keys and Keypad option to SCO.
5. Power on the board. A GNU GRUB boot loader menu is displayed (below)。Exit GRUB by entering c and quit as shown below.
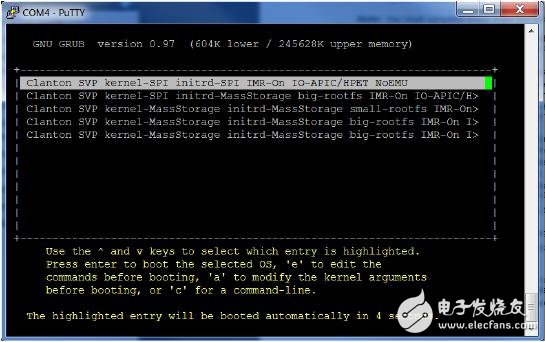
Press c to get a command line.
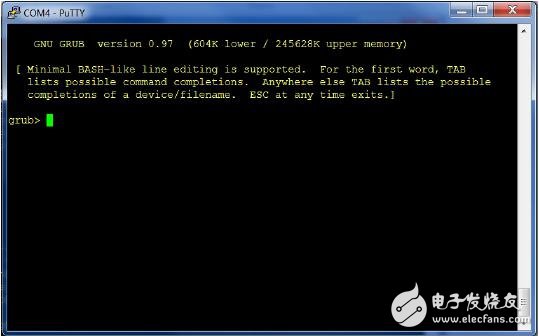
At the GRUB command line, type quit.
6. The serial console displays a boot device selection box (below)。Select UEFI Internal Shell.
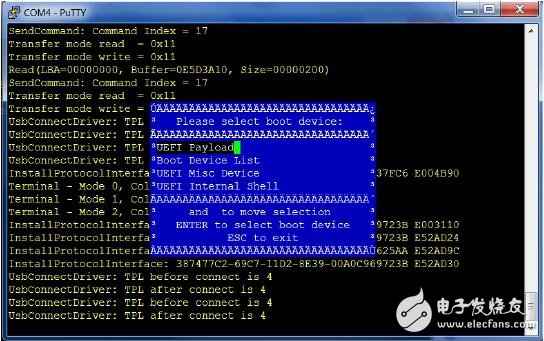
You will see a display similar to this:
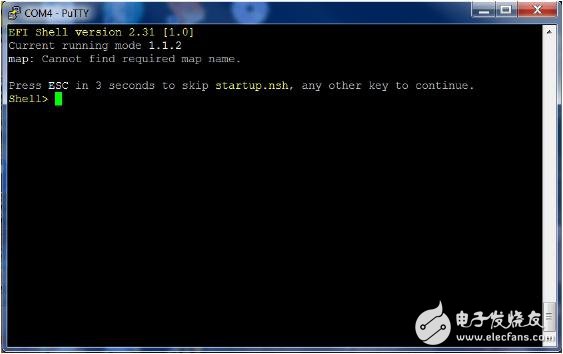
7. You will see a print out, the top line of which looks like this:fs0 :HardDisk - Alias hd7b blk0
This is your SD card. To mount it, type: fs0:
8. Verify you are using the correct version of CapsuleApp.efi by using the -v option. You must use version 1.01 or later.
9. Enter the following command:CapsuleApp.efi sysimage_nnnnn.cap
Note: You must enter the full filename of the sysimage_nnnnn.cap file.
You will see a display similar to this:

The CapsuleApp will update your SPI flash image. This process takes about 2 minutes.
Warning: DO NOT remove power or try to exit during this process. Wait for the prompt to
- IGBT 驱动器提供可靠保护(04-14)
- 华北工控基于Intel X86架构IOT网关产品解决方案(09-02)
- 热门类型机器人设计方案合集(08-27)
- 基于Intel Atom E3800的车载计算机解决方案(11-23)
- Intel第六代处理器 Skylake CPU、GPU、主板完全解析(09-06)
- 盘点那些年通用的FPGA芯片厂商(02-18)