ARM中的中断

其中,中断分为?
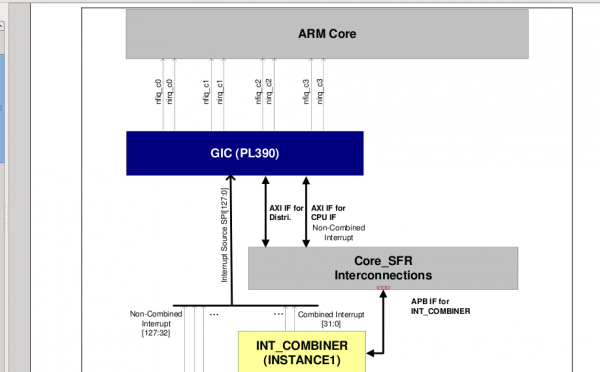
Supports three interrupt types:
Private Peripheral Interrupt (PPI)一个中断源对应一个CPU
Software Generated Interrupt (SGI) CPU对应CPU
Shared Peripheral Interrupt (SPI) 一个中断源对应多个CPU
今天的例子是用SGI中断来实现的,在处理中断的时候,主要分三步:
//step 1: cpu cpsr
CPU允许中断
20 __asm__ __volatile__(
21 "mrs r0, cpsr\n"
22 "bic r0, r0, #0x80\n"//设置CPSR的I位,将IRQ位打开
23 "msr cpsr, r0\n"
24 ::: "r0"
25 );
26
27//step 2: GIC
GIC
28 ICCICR_CPU0 = 1;//CPU接口控制寄存器
29 ICCPMR_CPU0 = 0xff;//中断优先标志寄存器
30 ICDDCR = 1;//设置本中断的开关
31 ICDIPR0_CPU0 = (0x00 < 0);//本中断的优先级
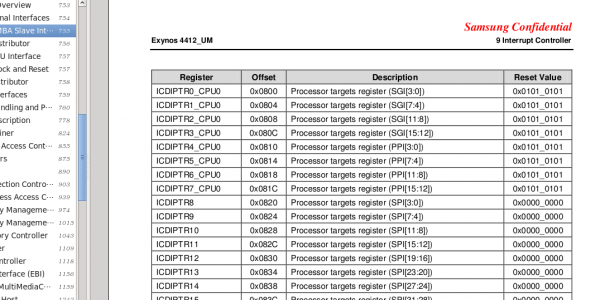
32 ICDIPTR0_CPU0 = 1;//选择指定的CPU
33 ICDISER0_CPU0 = (1 < 0);//设置本中断开启
34 各个寄存器描述如下:详细见4412 782页
35//step 3: interrupt source
中断源
36 ICDSGIR = 0 (1 < 16) (0 < 24);//SGI控制寄存器CPUTargetList.TargetListFi lte
37 printf("welcome back! \n");
下面是代码:
1 #include"regs.h"2 3 int (*printf)(char *, ...) = 0xc3e114d8;4 5 void init_ttb(unsigned long *addr);6 void enable_mmu(void);7 unsigned long data_abort_init();8 void memcopy(unsigned long* dest,unsigned long* source,int len);9 void do_irq();10 11 int main()12 {13 *(unsigned long *)0x66 = do_irq;14 unsigned long source_addr=data_abort_init();15 printf("swi_souce addr is %x\n",source_addr);16 memcopy(0x60,source_addr,0x1);17 enable_mmu();18 19 //step 1: cpu cpsr20 __asm__ __volatile__(21 "mrs r0, cpsr\n"22 "bic r0, r0, #0x80\n"//设置CPSR的I位,将IRQ位打开23 "msr cpsr, r0\n"24 ::: "r0"25 );26 27 //step 2: GIC 28 ICCICR_CPU0 = 1;//CPU接口控制寄存器29 ICCPMR_CPU0 = 0xff;//中断优先标志寄存器30 ICDDCR = 1;//设置本中断的开关31 ICDIPR0_CPU0 = (0x00 < 0);//本中断的优先级32 ICDIPTR0_CPU0 = 1;//选择指定的CPU33 ICDISER0_CPU0 = (1 < 0);//设置本中断开启34 35 //step 3: interrupt source36 ICDSGIR = 0 (1 < 16) (0 < 24);//SGI控制寄存器CPUTargetList.TargetListFi lte37 printf("welcome back! \n");38 }39 40 void do_irq()41 {42 unsigned long data = ICCIAR_CPU0;43 unsigned long irq_id = data & 0x3ff;44 unsigned long cpu_id = (data >> 10) & 0x7;45 ICCEOIR_CPU0 = irq_id (cpu_id < 10);46 printf("irq is %d, cpu is %d\n", irq_id, cpu_id);47 }48 49 void memcopy(unsigned long* dest, unsigned long* source,int len)50 {51 int i=0;;52 for(i=0;i> 20] = pa 2;154 //2的目的是将0-2位置为10此时将是小页模式4K155 }156 157 //00-10 ==== 6070158 for(va=0x00; va<=0x10; va+=0x100){159 pa = va+0x60;160 addr[va >> 20] = pa 2;161 }162 163 //10-14 ==== 1014164 for(va=0x10; va<=0x14; va+=0x100){165 pa = va;166 addr[va >> 20] = pa 2;167 }168 169 //30-40 ==== 5060170 for(va=0x30; va<0x40; va+=0x100){171 pa = va + 0x20;172 addr[va >> 20] = pa 2;173 }174 }175 176 void enable_mmu(void)177 178 {179 unsigned long addr = 0x70;180 init_ttb(addr);181 //step:初始化页表182 183 unsigned long mmu = 1 (1 < 1) (1 < 8);184 //将MMU的第0,1,8位置1185 __asm__ __volatile__(186 "mov r0, #3\n"187 "MCR p15, 0, r0, c3, c0, 0\n"//manager188 "MCR p15, 0, %0, c2, c0, 0\n"//addr 189 "MCR p15, 0, %1, c1, c0, 0\n"// enable mmu190 :191 : "r" (addr), "r" (mmu)192 : "r0"193 );194 printf("MMU is enable!\n");195 }196 在代码中,主函数其他的部分在前面都已经说了,已不再说。主要是在VICTOR函数中,将处理中断的部分,做成了一个函数,以后更容易修改处理的部分。
void do_irq()
41 {
42 unsigned long data = ICCIAR_CPU0;//取出IRQ ID 和CPU ID
43 unsigned long irq_id = data & 0x3ff;
44 unsigned long cpu_id = (data >> 10) & 0x7;
45 ICCEOIR_CPU0 = irq_id (cpu_id < 10);//清除CPU
46 printf("irq is %d, cpu is %d\n", irq_id, cpu_id);
47 }
//总的来说,在以前的基础上面,今天主要认识了GIC的配置,更重要的是,中断分为四步:
ARM中 相关文章:
- ARM·中断控制器(11-24)
- ARM中的预取命令pld的使用(11-22)
- ARM中的MOV指令(11-20)
- ARM中的汇编指令(11-20)
- ARM中的ldr指令与adr、ldr伪指令之间的区别(11-20)
- ARM 中断状态和SVC状态的堆栈切换 (异常)(11-20)