单片机超声波测距程序


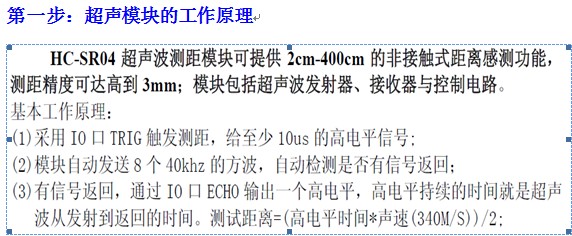
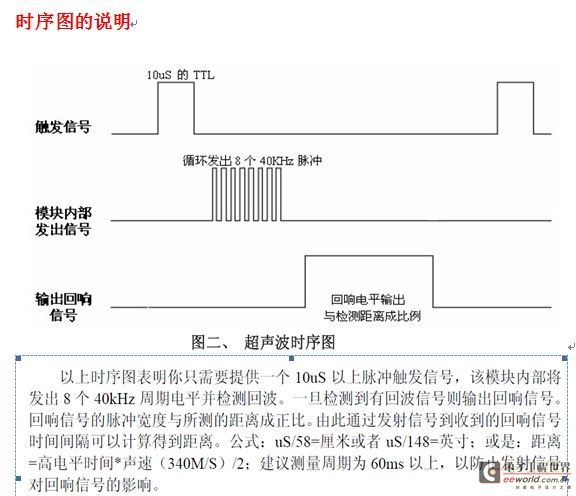
P10,P11,P12为位选,采用共阳数码管显示。精确到CM级别。tring为发射控制,本程序定义为P20引脚。 echo接外部中断0.
#include
sbit wei_ge=P1^0;
sbit wei_shi=P1^1;
sbit wei_bai=P1^2;
sbit a=P2^3;
#define uchar unsigned char
#define uint unsigned int
int time;
int succeed_flag;
uchar timeL;
uchar timeH;
sbit Trig=P2^0;
sbit Echo=P3^2;
uchar code table[]={0xc0,0xf9,0xa4,0xb0,0x99,0x92,0x82,0xf8,0x80,0x90,0x88,0x83,0xc6,0xa1,0x86,0x8e};
void delay(uint z)
{
uint x,y;
for(x=z;x>0;x--)
for(y=110;y>0;y--);
}
void delay_20us()
{
uchar a ;
for(a=0;a<100;a++);
}
//显示数据转换程序
void display(uint temp)
{
uchar ge,shi,bai;
bai=temp/100;
shi=(temp%100)/10;
ge=temp%10;
P0=table[ge]; //送数字8到段码端口
wei_ge=0;
delay(5);
// P0=table[shi];
// wei_shi=0;
// delay(5);
// P0=table[bai]; //送数字8到段码端口
// wei_bai=0;
// delay(5);
if(temp>150)
a=0;
else
a=1;
}
void main()
{
uint distance;
Trig=0; //首先拉低脉冲输入引脚
EA=1; //打开总中断0
TMOD=0x10; //定时器1,16位工作方式
while(1)
{
EA=0; //关总中断
Trig=1; //超声波输入端
delay_20us(); //延时20us
Trig=0; //产生一个20us的脉冲
while(Echo==0); //等待Echo回波引脚变高电平
succeed_flag=0; //清测量成功标志
EA=1;
EX0=1; //打开外部中断0
TH1=0; //定时器1清零
TL1=0; //定时器1清零
TF1=0; //计数溢出标志
TR1=1; //启动定时器1
delay(10); //等待测量的结果
TR1=0; //关闭定时器1
EX0=0; //关闭外部中断0
if(succeed_flag==1)
{
time=timeH*256+timeL;
distance=time*0.0172; //厘米
}
if(succeed_flag==0)
{
distance=0; //没有回波则清零
}
display(distance);
}
}
//外部中断0,用做判断回波电平
void exter() interrupt 0 // 外部中断0是0号
{
EX0=0; //关闭外部中断
timeH =TH1; //取出定时器的值
timeL =TL1; //取出定时器的值
succeed_flag=1;//至成功测量的标志
}
//定时器1中断,用做超声波测距计时
void timer1() interrupt 3 //
{
TH1=0;
TL1=0;
}
单片机超声波测 相关文章:
- 51单片机驱动超声波测距模块C51程序(11-30)
- 简单的单片机超声波测距板(11-30)
- 比较简单的AVR单片机超声波测距的实例(11-30)
- AT89C2051单片机超声波测距系统硬件原理(11-30)
- 基于C8051单片机超声波测距电平触发编写(11-29)
- 51单片机超声波测距C程序(11-27)
