IAR 打开CC1310 SDK编译出错,寻找解决方法?
下面是编译出错的截图信息:
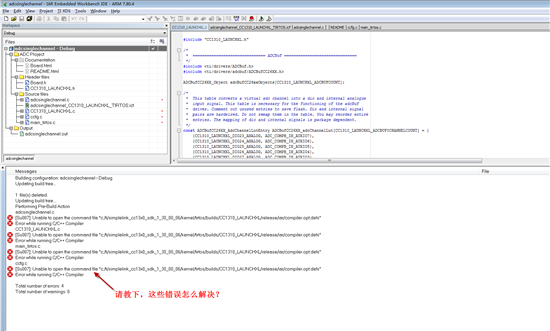
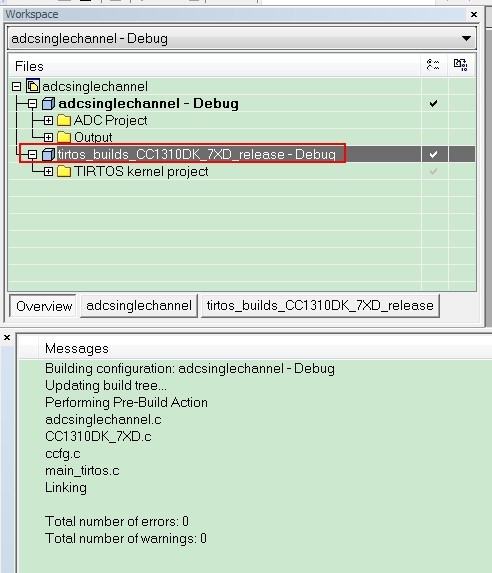
1.看着象pre-build出了问题,也没看到你的TI-RTOS工程,应该是导入方法不正确. 先follow 如下link正确导入,
http://processors.wiki.ti.com/index.php/Creating_SimpleLink_SDK_Applications_in_IAR_Embedded_Workbench
Creating TI-RTOS Applications in IAR Embedded Workbench
TI-RTOS supports IAR Embedded Workbench and code generation tools for ARM and MSP430. This wiki page documents the instructions for setup, creating, building and debugging TI-RTOS applications using IAR tools.
Note: These instruction are specific to the TI-RTOS 2.x product releases. For TI-RTOS 3.x releases and above for the MSP432, CC32xx, CC26xx, or CC13xx devices, all of TI-RTOS product content is now in the SimpleLink SDK. The existing TI-RTOS products for these devices will still be available, but for new customer development, we strongly recommend you use the corresponding SimpleLink SDK
See the following sources for more information about using TI-RTOS.
- TI-RTOS Getting Started Guide for MSP430 (SPRUHU4)
- TI-RTOS Getting Started Guide for Tiva C (SPRUHU5)
- TI-RTOS Getting Started Guide for SimpleLink Wireless MCUs (SPRUHU8)
- TI-RTOS User's Guide (SPRUHD4)
Creating TI-RTOS Examples with IAR Embedded Workbench
Follow these steps to import a TI-RTOS example into an IAR project:
- First, choose Project > Create New Project from the IAR menus.
- Select the correct Tool chain and choose the Empty project template. Click OK.
- Browse to the location where you want to save this project, and type a name for the project file (*.ewp). It is best to use a directory that does not contain other projects or workspaces. Click Save.
 Note: Do not use names for a project or workspace that contain spaces.
 - Choose File > Save Workspace from the IAR menus.
- Browse to the location where you want to save this workspace and type a name for the workspace file (*.eww). It is common to save the project and workspace in the same directory. Click Save. Note: Do not use names for a project or workspace that contain spaces.
- Make sure that custom arguments are enabled for this workspace. To do so, choose Tools > Configure Custom Argument Variables. The imported custom arguments should be enabled under the Workspace Tab in the opened dialog as shown in the screenshot below.

- Close and re-open IAR Embedded Workbench, this is in order for the custom argument variables changes to take effect.
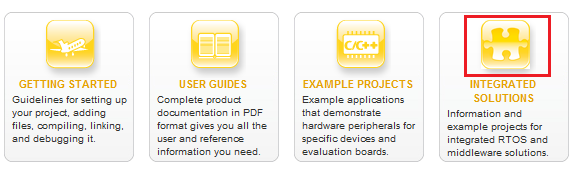
- If the IAR Information Center is not open, choose Help > Information Center from the IAR menus.
- Click the Integrated Solutions link.
- In the partners table, click the Example Projects button in the Texas Instruments row.

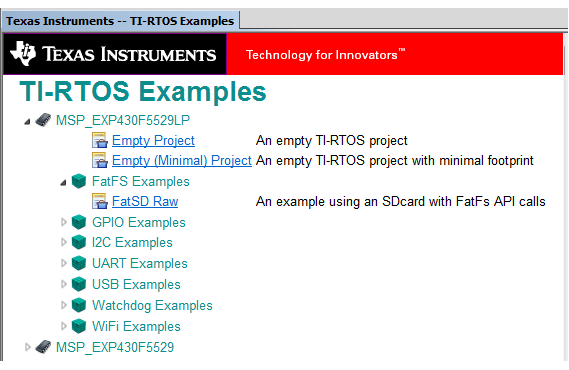
- Click the "example applications" link to open the Texas Instruments -- TI-RTOS Examples page.
- Expand the list of examples. Click on an example to add files for that example to your current project. This figure shows MSP430 examples:
- Right-click on the project file, and choose Options. Select the Debuggercategory.
- For Tiva C targets, choose the TI Stellaris debugger in the Setup tab.
- For SimpleLink CC13xx/CC26xx ARM targets using the SmartRF06 board, choose TI XDS in the Setup tab. In the Download tab, enable "Use flash loader(s)". Below, for the TI XDS category, in the Setup tab, select TI XDS100v3 USB Emulator and cJTAG as Interface.
- For SimpleLink CC13xx/CC26xx ARM targets with the debug DevPak, SensorTag, or LaunchPad, choose TI XDS in the Setup tab. In the Download tab, enable "Use flash loader(s)". Below, for the TI XDS category, in the Setup tab, select TI XDS110 Emulator and cJTAG as Interface.
- For SimpleLink CC32xx ARM targets, choose the TI Stellaris debugger in the Setup tab.
- For MSP430 targets, choose the FET Debugger in the Setup tab.
- For MSP432 ARM targets, choose the TI XDS debugger in the Setup tab. In the Download tab enable "Use flash loader(s)". Select the TI XDS category, and in the Setup tab select the TI XDS110 Emulator.

- If you are using an ARM target (except for CC3200), in the Download tab, be sure to put a checkmark in the Use flash loader(s) box.
- Move to the Plugins tab and put a checkmark in the box next to TI-RTOS. This enables the RTOS Object View (ROV) plugin tools. Click OK. Note that you will need to change these Debugger options separately for each TI-RTOS project you create in IAR.
也建议你使用CCS,免费,简单 和TI-RTOS更配
http://processors.wiki.ti.com/index.php/Download_CCS
Download the latest CCS
| Download 7.3.0.00019 | Installers ( Offline installer is recommended for slow and unreliable connections) |
|---|---|
| Windows | Offline Installer Online Installer |
Free license for older versions
With the release of CCSv7 all previous v4, v5 and v6 releases are free of charge. Simply unzip and copy the License File for Older versions into <install dir>/ccs_base/DebugServer/license. Then go to Help -> Code Composer Studio Licensing information and point CCS to this license file. Restart CCS.
Deprecation notices:
- The 32-bit version of Code Composer Studio for Linux is discontinued in favor of a 64-bit version since CCSv6.2.0.
- Windows XP support is deprecated with the release of CCSv7.0.0.
- Spectrum Digital XDS510USB JTAG debuggers are not supported with 64bit CCS installations. Currently this impacts Linux and MacOS.
- Stellaris (LM3S and LM4F) devices are not supported starting with CCSv7.0.0.