cc1310在debug运行正常,但是正常上电就不能运行
cc1310在debug运行正常,但是正常上电就不能运行,不知道是什么原因造成的
1. 用的CCS还是IAR?
2. 跑的什么例子?
3. 直接用Flash programmer2 烧写情况怎样?
iar ,我自己写的程序,原本是好好,直接上电都是可以运行的,突然今天就不能下载,我问题你们的代理商的研发的人员,他们也遇到过这样的问题,建议我重新建工程。
Flash programmer2烧写也是不行
你是自己从头开始建立工程的? 建议先用 IAR导入一个例子工程,然后基于它增加自己的代码,这样最快最有效。这种debug ok, 烧写却不行的情况没见过,
你也可以和导入的工程对比IAR-option里的各种设置,来看是否有不同的地方。
http://processors.wiki.ti.com/index.php/Creating_TI-RTOS_Applications_in_IAR_Embedded_Workbench#Generating_the_Files_for_the_TI-RTOS_Examples
Integrating TI-RTOS Examples with the IAR IDE
In order for IAR to discover TI-RTOS, you must do the following once before you can create, build, and run TI-RTOS examples within IAR:
- Open IAR Embedded Workbench.
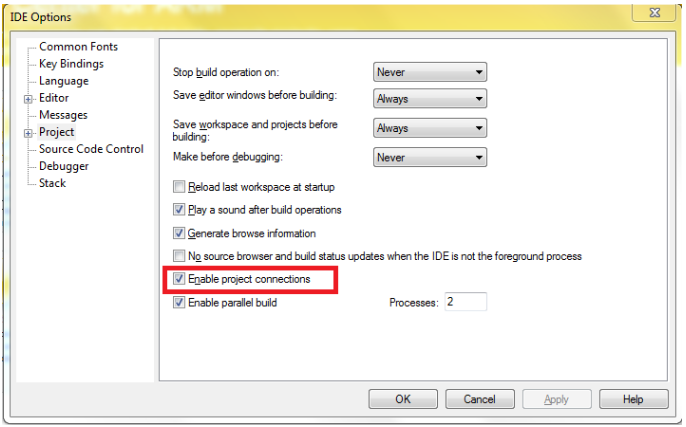
- Choose Tools > Options to open the IDE Options dialog. Select the Project category and check the box to Enable project connections. Click OK.
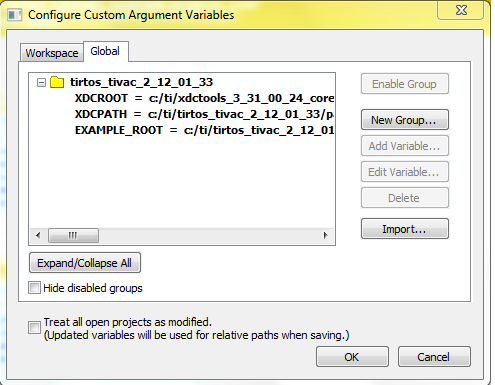
- Choose Tools > Configure Custom Argument Variables. This opens a dialog that allows you to define paths to integrate TI-RTOS with IAR Embedded Workbench.
- Select the Global tab, and click Import.
- Browse to the IAR subdirectory of the examples tree in TI-RTOS. For example, browse to the "C:/ti/tirtos_####_#_##_##_##/tirtos_#_##_##_##_examples/IAR" directory. In case of TI-RTOS for MSP43x, the IAR subdirectory is "C:/ti/tirtos_msp43x_##_##_##/tirtos_msp43x_##_##_##_examples/MSP430/IAR" for MSP430 and "C:/ti/tirtos_msp43x_##_##_##/tirtos_msp43x_##_##_##_examples/MSP432/IAR" for MSP432.
- Select the
tirtos_#_##_##_##.custom_argvarsfile, and click Open. - The result should look similar to the following figure. Click OK to finish.
Creating TI-RTOS Examples with IAR Embedded Workbench
Follow these steps to import a TI-RTOS example into an IAR project:
- First, choose Project > Create New Project from the IAR menus.
- Select the correct Tool chain and choose the Empty project template. Click OK.
- Browse to the location where you want to save this project, and type a name for the project file (*.ewp). It is best to use a directory that does not contain other projects or workspaces. Click Save.
 Note: Do not use names for a project or workspace that contain spaces.
 - Choose File > Save Workspace from the IAR menus.
- Browse to the location where you want to save this workspace and type a name for the workspace file (*.eww). It is common to save the project and workspace in the same directory. Click Save. Note: Do not use names for a project or workspace that contain spaces.
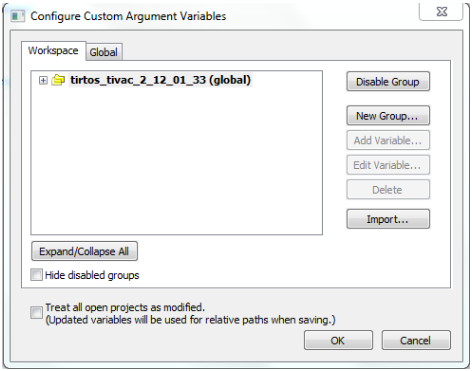
- Make sure that custom arguments are enabled for this workspace. To do so, choose Tools > Configure Custom Argument Variables. The imported custom arguments should be enabled under the Workspace Tab in the opened dialog as shown in the screenshot below.
- Close and re-open IAR Embedded Workbench, this is in order for the custom argument variables changes to take effect.
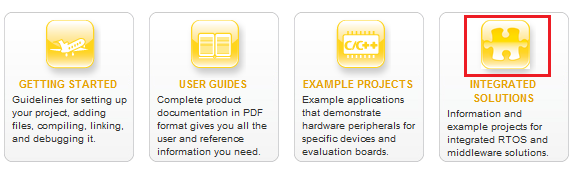
- If the IAR Information Center is not open, choose Help > Information Center from the IAR menus.
- Click the Integrated Solutions link.
- In the partners table, click the Example Projects button in the Texas Instruments row.

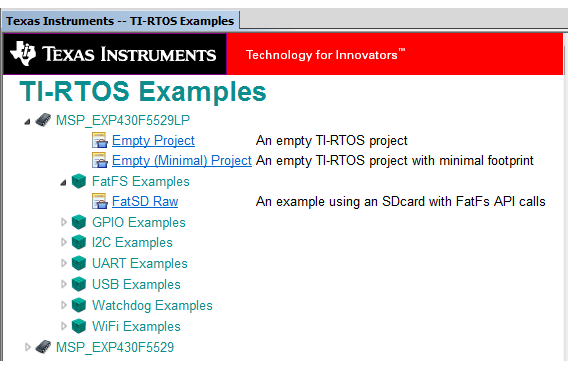
- Click the "example applications" link to open the Texas Instruments -- TI-RTOS Examples page.
- Expand the list of examples. Click on an example to add files for that example to your current project. This figure shows MSP430 examples:
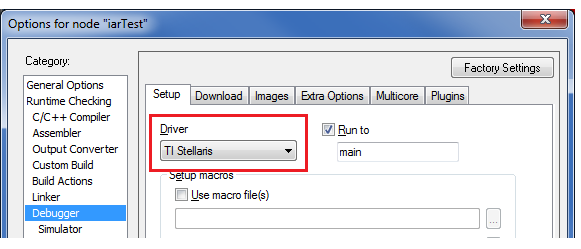
- Right-click on the project file, and choose Options. Select the Debugger category.
- For Tiva C targets, choose the TI Stellaris debugger in the Setup tab.
- For SimpleLink CC13xx/CC26xx ARM targets using the SmartRF06 board, choose TI XDS in the Setup tab. In the Download tab, enable "Use flash loader(s)". Below, for the TI XDS category, in the Setup tab, select TI XDS100v3 USB Emulator and cJTAG as Interface.
- For SimpleLink CC13xx/CC26xx ARM targets with the debug DevPak, SensorTag, or LaunchPad, choose TI XDS in the Setup tab. In the Download tab, enable "Use flash loader(s)". Below, for the TI XDS category, in the Setup tab, select TI XDS110 Emulator and cJTAG as Interface.
- For SimpleLink CC32xx ARM targets, choose the TI Stellaris debugger in the Setup tab.
- For MSP430 targets, choose the FET Debugger in the Setup tab.
- For MSP432 ARM targets, choose the TI XDS debugger in the Setup tab. In the Download tab enable "Use flash loader(s)". Select the TI XDS category, and in the Setup tab select the TI XDS110 Emulator.
- If you are using an ARM target (except for CC3200), in the Download tab, be sure to put a checkmark in the Use flash loader(s) box.
- Move to the Plugins tab and put a checkmark in the box next to TI-RTOS. This enables the RTOS Object View (ROV) plugin tools. Click OK. Note that you will need to change these Debugger options separately for each TI-RTOS project you create in IAR.
我找到问题所在了,主要我改了icf的flash文件配置,
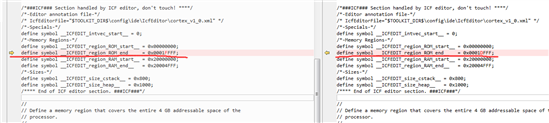 ,我主要想将flash的最后的8k空间用于数据存储。我应该怎么配置这个文件才能达到我要效果了?