cvThreshold阈值操作实现二值图像
图像处理操作中,进程需要对图像的像素点进行取舍处理,直接剔除一些低于或者高于一定值的像素,也就是阈值操作。阈值被视为最简单的图像分割方法,OpenCV中主要借助Threshold()函数来实现基本阈值操作。
Threshold是opencv库中的一个函数,其作用主要是对单通道数组应用固定阈值操作。该函数的典型应用是对灰度图像进行阈值操作得到二值图像。
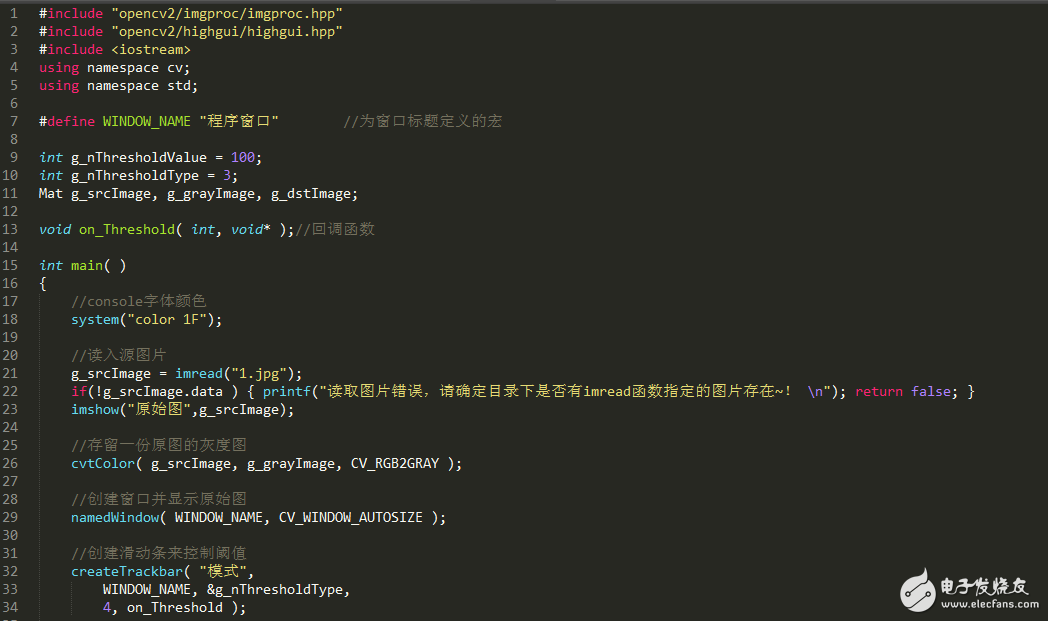
(cvCmpS 也可以达到此目的) 或者是去掉噪声,例如过滤很小或很大象素值的图像点。该函数支持的对图像取阈值的方法由threshold_type确定。这里借助dragonboard强大的性能在其上进行阈值相关操作。通过简单的按键和不同的阈值模式切换进行实例演示。代码有如下:

- #include "opencv2/imgproc/imgproc.hpp"
- #include "opencv2/highgui/highgui.hpp"
- #include <iostream>
- using namespace cv;
- using namespace std;
- #define WINDOW_NAME "程序窗口" //为窗口标题定义的宏
- int g_nThresholdValue = 100;
- int g_nThresholdType = 3;
- Mat g_srcImage, g_grayImage, g_dstImage;
- void on_Threshold( int, void* );//回调函数
- int main( )
- {
- //console字体颜色
- system("color 1F");
- //读入源图片
- g_srcImage = imread("1.jpg");
- if(!g_srcImage.data ) { printf("读取图片错误,请确定目录下是否有imread函数指定的图片存在~! \n"); return false; }
- imshow("原始图",g_srcImage);
- //存留一份原图的灰度图
- cvtColor( g_srcImage, g_grayImage, CV_RGB2GRAY );
- //创建窗口并显示原始图
- namedWindow( WINDOW_NAME, CV_WINDOW_AUTOSIZE );
- //创建滑动条来控制阈值
- createTrackbar( "模式",
- WINDOW_NAME, &g_nThresholdType,
- 4, on_Threshold );
- createTrackbar( "参数值",
- WINDOW_NAME, &g_nThresholdValue,
- 255, on_Threshold );
- //初始化自定义的阈值回调函数
- on_Threshold( 0, 0 );
- //轮询等待用户按键,如果ESC键按下则退出程序
- while(1)
- {
- int key;
- key = waitKey( 20 );
- if( (char)key == 27 ){ break; }
- }
- }
- void on_Threshold( int, void* )
- {
- //调用阈值函数
- threshold(g_grayImage,g_dstImage,g_nThresholdValue,255,g_nThresholdType);
- //更新效果图
- imshow( WINDOW_NAME, g_dstImage );
- }
具体实现效果图:


其中函数形式为:void cvThreshold( const CvArr* src, CvArr* dst, double threshold, double max_value, int threshold_type );
- src:原始数组 (单通道 , 8-bit of 32-bit 浮点数)。
- dst:输出数组,必须与 src 的类型一致,或者为 8-bit。
- threshold:阈值
- max_value:使用 CV_THRESH_BINARY 和 CV_THRESH_BINARY_INV 的最大值。
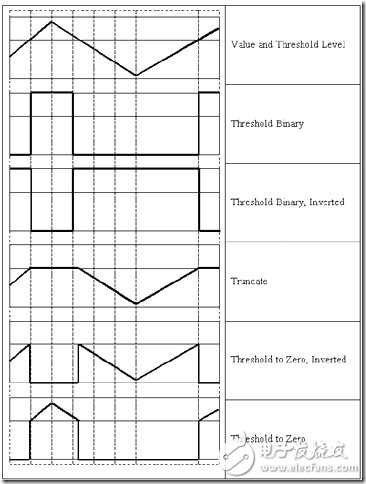
- threshold_type:阈值类型 threshold_type=CV_THRESH_BINARY:
如果 src(x,y)>threshold ,dst(x,y) = max_value; 则,des(x,y)=0;
threshold_type=CV_THRESH_BINARY_INV:
下面给出图形化阈值描述,仅供参考

总结:
在利用dragonboard410c学习openCV过程中,通过一些实验的学习,对OpenCV有了基本的认识,另外通过一些简单的GPIO口操作,对底层硬件设计有了一定了解。另外dragonboard相比之前用过的板卡,在整体性能都十分突出。但也有些小问题,比如UVC摄像头无法驱动起来,还在进一步找原因,其他和大家进一步交流学习。
附:1、【DragonBoard 410c试用体验】之开箱初见(8.27)
http://bbs.elecfans.com/jishu_932902_1_1.html
2、【DragonBoard 410c试用体验】烧写Debian镜像到EMMC(8.27)
http://bbs.elecfans.com/jishu_932909_1_1.html
3、【DragonBoard 410c试用体验】之系统初体验&启动root用户(8.27)
http://bbs.elecfans.com/jishu_932915_1_1.html
4、【DragonBoard 410c试用体验】之VNC远程桌面问题(8.27)
http://bbs.elecfans.com/jishu_932921_1_1.html
5、【DragonBoard 410c试用体验】DragonBoard 410c官方全套文档(8.27)
http://bbs.elecfans.com/jishu_932924_1_1.html
6、【DragonBoard 410c试用体验】之编译测试和LED点灯实验(8.27)
http://bbs.elecfans.com/jishu_932932_1_1.html
7、【DragonBoard 410c试用体验】之运行x11vnc -ncache 10解决远程桌面问题(9.2)
http://bbs.elecfans.com/jishu_935604_1_1.html
8、【DragonBoard 410c试用体验】之搭建OpenCV开发环境并Demo测试(9.2)
http://bbs.elecfans.com/jishu_935623_1_1.html
9、【DragonBoard 410c试用体验】之添加simpleCV库和Python IDLE(9.7)
http://bbs.elecfans.com/jishu_937169_1_1.html
10、【DragonBoard 410c试用体验】之OpenCV加载图片实验(9.10)
http://bbs.elecfans.com/jishu_937913_1_1.html
11、【DragonBoard 410c试用体验】之OpenCV均值滤波介绍(9.11)
http://bbs.elecfans.com/jishu_938046_1_1.html
12、【DragonBoard 410c试用体验】之OpenCV中canny算子边缘检测(9.11)
http://bbs.elecfans.com/jishu_938083_1_1.html
13、【DragonBoard 410c试用体验】 之OpenCV中之图像角点检测实现(9.13)
http://bbs.elecfans.com/jishu_938483_1_1.html
