STM32学习笔记——使用函数库编程控制GPIO口输出
1.
先从网上下载3.5版(据说3.0版以后的固件库才逐渐稳定)stm32固件库(stm32f10x_stdperiph_lib)。由于与固件库版本兼容问题,重新下载安装了IAR6.30版。
1.1 创建项目文件夹“project”;
1.2
1.3
1.4
1.5


其中:
l
l
l
startup_stm32f10x_cl.s
startup_stm32f10x_hd.s
startup_stm32f10x_hd_vl.s
startup_stm32f10x_ld.s
startup_stm32f10x_ld_vl.s
startup_stm32f10x_md.s
startup_stm32f10x_md_vl.s
startup_stm32f10x_xl.s
其中大、中、小容量的区分如下图所示:

各型号名称辨识如下图所示:
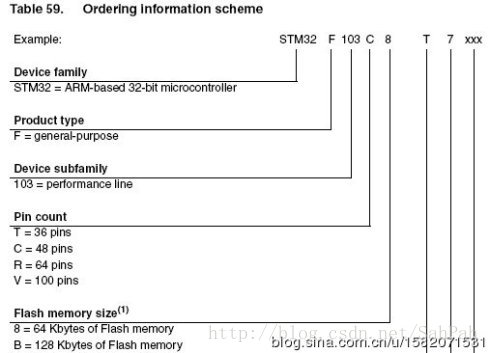
个人所使用的芯片型号是STM32F103VBT6,所以是属于中等容量,所以选择的是”startup_stm32f10x_md.s”文件。
l
l
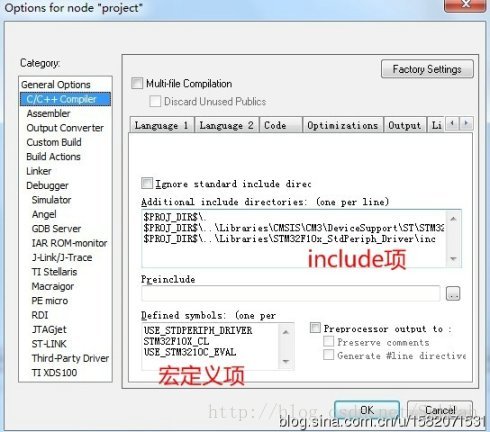
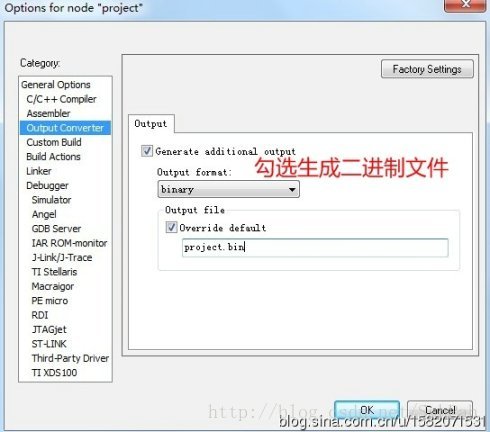
项目设置
C/C++Compiler>Preprocessor项:

至此,工程设置完毕,可以往main文件里写空代码试着编译,如:
[cpp]view plaincopy
- #include“stm32f10x.h”
- Intmain()
- {While(1);}
编译无误后即可开始写自己的代码。
附注:关于CMSIS的core_cm3文件,在编译的时候经常会报错,一般是无法找到”core_cm3.h”文件,但实际上该文件与”core_cm3.c”同处于同一个目录,具体原因未明。解决方法如下:
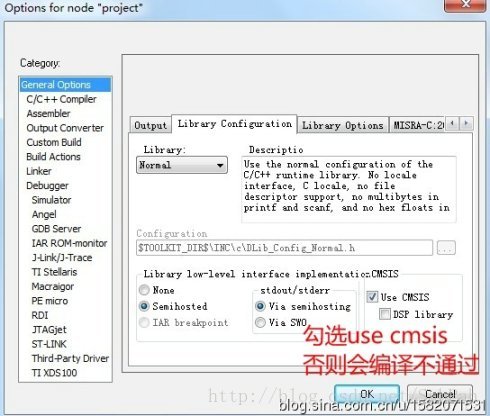
l
A special note on CMSISintegration:
If your application source code include CMSISheader files explicitly, then you should not check theUse CMSIScheck-boxProject>Options...>GeneralOptions>Library Configuration>UseCMSIS. Some of the Cortex-M application examplesincludes CMSIS source files explicitly, do not check the saidcheck-box in these projects.
However, due to the evolution of the IAR C/C++ Compiler for ARM,older versions of CMSIS are incompatible with the current versionof the compiler. One simple example of how to solve this issueis:
a) Press F4 to bring up the erroneous source (header) file in theeditor - in most cases named core_cm3.h.
b) Right-click on the window tab of that editor window,chooseFile Properties....
c) Add (or remove) any character to the file name - so the compilerwont find it any more.
d) Modify project options: CheckProject>Options...>GeneralOptions>Library Configuration>UseCMSIS.
Steps a) to c) might need to be done for more than one file.Normally, the names of these files are core_cm0.h, core_cm3.h,core_cm4.h, core_cmFunc.h and core_cmInstr.h.
STM32函数库编程控制GPIO 相关文章:
- Windows CE 进程、线程和内存管理(11-09)
- RedHatLinux新手入门教程(5)(11-12)
- uClinux介绍(11-09)
- openwebmailV1.60安装教学(11-12)
- Linux嵌入式系统开发平台选型探讨(11-09)
- Windows CE 进程、线程和内存管理(二)(11-09)