CC2531 USB DONGLE做协调器
先说下我现在手上的设备:CC2531 USB dongle,CC2530的PWM彩灯,
我想现在通过usb dongle 做协调器,通过电脑控制彩灯.我的dongle和pwm彩灯都是一家淘宝厂家的,之前厂家给的实验用例是cc2530的开发板做协调器,我把厂家给的开发用例用IAR烧入彩灯和usb dongle后,实现了入网但是不能用电脑控制彩灯(dongle选了coodinator,彩灯选择了endpoint),
我不知道问题出在哪里,我需要修改什么设置么?
你问厂家不是更容易知道问题所在吗?
TI之前有类似的操作说明供参考吧
http://processors.wiki.ti.com/index.php/ZStack-Lighting_Kit_CC2531EMK
ZStack-Lighting Kit CC2531EMK
Contents
[hide]- 1 CC2531EMK ZLL Remote
- 2 Using The CC2531EMK ZLL Remote
- 2.1 More Advanced Control
- 3 Generating the ZStack-Lighting Kit FW from ZStack-Lighitng-1.0.x Release
- 4 Updating the Kit FW image using the Windows bootloader tool
CC2531EMK ZLL Remote
The CC2531EMK USB dongle was included in older ZLL kits before the ZLLRC was available.
The CC2531EKM USB dongle Remote is not a supported HW platform in the ZStack-Lighting-1.0.x release and now that the ZLLRC is available is longer supplied as part of the kit. This wiki page has been created for customers that already have the old kit.
The FW source for the CC2531EMK USB Dongle remote is available in the kit FW patch here.
Using The CC2531EMK ZLL Remote
The CC2531EMK ZLL Remote exposes the following functionality through the button S1 and S2:
| Button | Press | Function |
|---|---|---|
| S1 | Press | Touchlink |
| S1 | Release | Touchlink abort |
| S2 | Short press (<1s) | Toggles between sending on command and off command |
| S2 | Medium press (>2s) | Select next device (selecting the group as the last device) |
| S1 + S2 | Long press (>10s) | Reset to Factory New |
CC2531EMK ZLL Remote user feedback is given through the LEDs, with the following meaning:
| LED | State | Function |
|---|---|---|
| RED LED | Flash on start up | Remote is Factory New |
| GREEN LED | Flash on start up | Remote is not Factory New |
| RED LED | On | Button pressed |
| RED LED | Off | Button released |
| GREEN LED | Flash after start up | TouchLink succeeded |
| RED AND GREEN LED | Flash after start up | Resetting to Factory New |
More Advanced Control
The Zlight is a Color Light and the CC2531EMK is a Color Scene Remote, but up until now you have only turned the Lights on and off. To do more you need to use the "Host Interface" of the ZStack-Lighting-1.0.x Remote. The full source for Linux and Window command line application is available here: https://git.ti.com/zllhostinterfaceexample/zllhostinterfaceexample/archive-tarball/master
To use the ZStack-Lighting-1.0.x Remote Host Interface with the CC2531EMK ZLL Remote:
- 1. Download the Windows ZLL Command Line Controller: https://git.ti.com/zllhostinterfaceexample/zllhostinterfaceexample/blobs/master/Win32/zllCmdLine/Release/zllCmdLine.exe
- 2. Extract usb_cdc_driver_cc2531.inf and zllCmdLine.exe to a dirrectory.
- 3. Plug in the CC2531EMK ZLL Remote USB Dongle into your Windows PC
- 4. When prompted for a driver use File:Usb cdc driver cc2531.zip.
- 5. Find the COM port number Windows has been assigned to it:
- a. Open device manager: Windows start menu -> Right click my computer -> Manage -> device manager
- b. Find the CC2531 listed under ports:

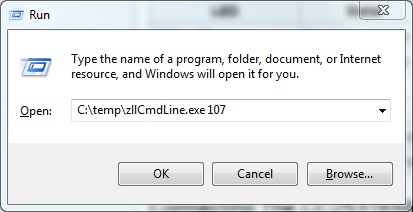
- 6. Launch the windows console application zllCmdLine.exe:
- a. Click windows start menu and type run in the search box and enter, then type the path you extracted zllCmdLine.exe to in step 2 and the COM number and enter:
- 7. Place one of the Zlights close (within 0.5m) of the CC2530EMK USB dongle.
- 8. Type "touchlink" in the console. It does not matter if the Zlight has already been touchlinked as part of Connecting The CC2531EMK ZLL Remote To The ZLights The First Time They Are Powered.
- 9. The Zlight should Flash and the following text should be printed to the console:
C:\Users\a0741319\Documents\temp\zllCmdLine.exe -- Mar 24 2013 17:02:45
touchlink
touchlink command executed

processRpcSysApp: Command Received Successfully

tlIndicationCb:
    Network Addr : 0x0002
    End Point    : 0x0b
    Profile ID   : 0xc05e
    Device ID    : 0x0200
    Version      : 0x02
    Status       : 0x57
Make a note of the Network Addr and End Point.
- 10. To control he Light type:
setstate -n0x0002 -e0x0b -m2 -v1
Your should see the following in the console and the Zlight should turn on.
setstate -n0x0002 -e0x0b -m2 -v1
setstate command executed with params:
    Network Addr    :0x0002
    End Point       :0x0b
    Addr Mode       :0x02
    Value           :0x01

processRpcSysApp: Command Received Successfully
- 11. Now set the Saturation to the highest (not you can now omit the other parameters as you are controlling the same light):
setsat -v0xfe
setsat command executed with params:
    Network Addr    :0x0002
    End Point       :0x0b
    Addr Mode       :0x02
    Value           :0xfe
    Transition Time :0x0001

processRpcSysApp: Command Received Successfully
- 12. Now set the hue to red (hue of 0):
sethue -v0
sethue command executed with params:
    Network Addr    :0x0002
    End Point       :0x0b
    Addr Mode       :0x02
    Value           :0x00
    Transition Time :0x0001

processRpcSysApp: Command Received Successfully
- 12. Now set the hue to transition to blue (hue of 0xAA) over 3s:
sethue -v0xAA -t30
sethue command executed with params:
    Network Addr    :0x0002
    End Point       :0x0b
    Addr Mode       :0x02
    Value           :0xaa
    Transition Time :0x001e

processRpcSysApp: Command Received Successfully
- Other Lights can be controlled by touchlink'ing and recording there Network Addr and End Point
- All Light can be controlled by addressing the group, use -m1 to select group mode and -n0x0001 for group 1 which the Lights are added to by default after touchlink. The broadcast End Point of -e0xFF should be used in case you are controlling ZLL Lights other than the TI ZStack-Lighting-1.0.x Lights.
The Host interface is part of the standard ZStack-Lighting-1.0.x release and is described in more detail here.
Generating the ZStack-Lighting Kit FW from ZStack-Lighitng-1.0.x Release
The ZStack-Lighting-1.0.1 Release is available for down load from http://www.ti.com/tool/z-stack. To update this release to generate the FW pre-programmed in to the Zlight in the kit a patch is required. The patch is available here: File:Z-Stack-Lighting-add-on-lighting-kit.zip. Instruction for applying the patch are incuded in the patch installer, this must be installed in to the ZStack-Lighting-1.0.1 folder. You will notice that this patch creates a "USB - EndDevice" configuration in the Remote project, this is for the CC2531EMK USB Dongle that was included in an earlier release of the kit. More information on this HW platform can be found here. Currently there is no source code released for the ZLLRC HW platform, this will be included in the ZStack-Lighting-1.0.2 release.
Updating the Kit FW image using the Windows bootloader tool
To update the Zlight or REmote FW:
- 1. Download the Windows serial bootloader: File:SBDemo.zip
- 2. Extract usb_cdc_driver_cc2531.inf and SBDemo.exe to a directory.
- 3. Plug in the Zlight while holding the button or CC2531EMK ZLL Remote USB Dongle while holding S1 into your Windows PC.
- a. Holding the button while powering will put the device into bootloader mode. The green LED will flash while it is waiting for a new image.
- 4. When prompted for a driver use File:Usb cdc driver cc2531.zip.
- 5. Find the COM port number Windows has been assigned to it:
- a. Open device manager: Windows start menu -> Right click my computer -> Manage -> device manager
- b. Find the CC2531 listed under ports:
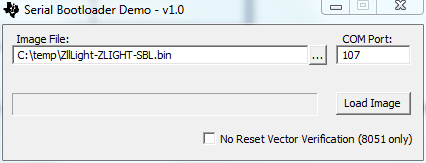
- 6. Launch the SBDemo.exe
- a. Select the file to update.
- b. Select the COM port.
- c. Click Load Image.
- 7. While updating the Green LED will blink rapidly for short intervals.
- 8. Once updated the RED and Green LED will Flash and the new image will boot.
很感谢您的答复,有询问过厂商并不能解决我的问题,关于串口控制我还不了解,不能找到到底哪里出了问题,厂商有提供桌面控制程序,并不能有效控制,我也不知道哪个地方出了问题.
我就想检测下串口传输哪里有问题!在IAR上能完全能跑通
MT_UartInit(); //串口初始化
MT_UartRegisterTaskID(task_id); //注册串口任务
HalUARTWrite(0,"UartInit OK\n", sizeof("UartInit OK\n"));//串口发送
P0SEL &= 0x7f; //DS18B20的io口初始化 p0.7
第三行的输出在电脑上也接受不到(之前程序没有这行)