超级终 端如何连接手机下AT Command
时间:10-02
整理:3721RD
点击:
[Desciption]
介绍 Feature Phone 平台如何通过超级终端等其他串口工具,连接手机下 AT 命令
[SULIBTION]
超级终端等串口工具连接手机下AT命令,需要完成手机端配置和PC端配置两部分,方法如下:
一、 手机端配置有以下 3 种方法 ( 第 1 种最方便 ) :
1.直接在MMI设置(推荐,适用于具有MMI的项目):
输入*#3646633# ---->Device---->Set UART---->UART Setting---->PS Config,对PS Config进行配置,选择端口和波特率,点击save,save后会自动重启,手机端配置就完成了。

2. 直接使用 maui meta tool 修改 NVRAM_EF_PORT_SETTING_LID 的方法 ( 适用于没有 MMI 的项目) :
(1) maui meta tool 连接上手机后,选择 NVRAM Eidtor ,导入 database ,读出NVRAM_EF_PORT_SETTING_LID 。
(2)如果需要连接超级终端等串口工具,那么请将ps_port配成所需端口(端口对应如(4)),如使用USB1,配成0x04;将tst_port_ps和tst_port_l1配置为其他端口,或配成0x63(输入99),表示不配置端口。
(3) 如果需要连接 cather tool ,那么请将 tst_port_ps 和 tst_port_l1 配成所需端口 ( 必须是同一端口 ) ,如使用 USB1 ,需配成 0x04 ;将 ps_port 配置为其他端口,或者配成 0x63( 输入 99),表示不配置端口。
(4) 端口对应如下:
UART1-UART3:0-2
USB1:4
USB2:5
NONE:99(0x63)
注意:如果配置成UART口,注意波特率的设置,tst_port_ps和tst_port_l1对应的是tst_baudrate_ps和tst_baudrate_l1,ps_port对应的是ps_baudrate,PC端catcher tool或者超级终端在配置波特率的时候需要和手机端一致。如果是配置成USB口,可以不用关心波特率的问题。

3. 在代码中修改配置,再重新编译的方法 (适用于固定使用某个端口) :
可以修改文件nvram_common_config.c中NVRAM_EF_PORT_SETTING_DEFAULT的配置。
注意检查MMI版本和宏的开启情况。
static port_setting_struct const NVRAM_EF_PORT_SETTING_DEFAULT[]=
{
{
#if defined (WISDOM_MMI) || defined(NEPTUNE_MMI)
0, /* tst-ps uses uart_port2(value is 1) */
1, /* APP uses uart_port1 (value is 0) */
#elif defined(__USB_MULTIPLE_COMPORT_SUPPORT__) && defined(__L4_INIT_MULTIUSB_COM__)
0, /* TST-PS uses uart_port1 */
5, /* ATCI uses uart_port_usb2 */
#else
0, /* tst-ps uses uart_port_null(value is 99) */ //配置tst-ps 的port,用于连catcher抓
log,0表示uart1,1表示uart2,...依此类推,99表示none,和前面的第2点(4)一致
1, /* APP uses uart_port1 (value is 0) */ //配置ps的port,用于超级终端下AT命令
#endif
#if defined(EMPTY_MMI) //配置tst-ps的波特率,catcher的配置必须与此一致
921600, /* tst default baud rate for project without MMI */
#elif defined (WISDOM_MMI)
/* under construction !*/
#elif defined(__USB_MULTIPLE_COMPORT_SUPPORT__) && defined(__L4_INIT_MULTIUSB_COM__)
921600, /* TST-PS baud uses 921600 */
#else
115200, /* tst default baud rate base = 115200 = 0x0001C200 */
#endif
#if defined (__PS_SERVICE__) //配置ps的波特率,例如连超级终端下AT,超级终端com口的波特
率配置必须与此一致
961200, /* ps default baud rate base = 115200 = 0x0001C200 */
#else
57600, /* ps default baud rate base = 57600 = 0x0000E100 */
#endif
KAL_FALSE, /* High SpeedSIM */
0, /* SWDBG */
#if defined(__ONLY_ONE_UART__)
1, /* uart power setting (0x03) */
#else
3,
#endif
99, /* CTI uart port: uart_null (value is 0x63 (99) */
0, /* CTI baud rate: auto*/
#if defined (WISDOM_MMI) || defined(NEPTUNE_MMI)
0,
#elif defined(__USB_MULTIPLE_COMPORT_SUPPORT__) && defined(__L4_INIT_MULTIUSB_COM__)
1, /* TST-L1 baud uses uart_port2 */
#else
0, /* tst-l1 uart port, same as tst-ps*/ //配置tst-l1的port,与tst-ps的port一致
#endif
#if defined(EMPTY_MMI) //配置tst-l1的波特率,与tst-ps的波特率一致
921600, /* tst default baud rate for project without MMI */
#elif defined (WISDOM_MMI)
/* under construction !*/
#elif defined(__USB_MULTIPLE_COMPORT_SUPPORT__) && defined(__L4_INIT_MULTIUSB_COM__)
921600, /* TST-L1 baud uses 921600 */
#else
115200, /* tst default baud rate base = 115200 = 0x0001C200 */
#endif
0, /* tst output mode*/
#if !defined( __UL1_STANDALONE__ )
0, /* USB logging mode */
#else
#if defined(__Modem_3G_LOGGING__) && defined(_DSPIRDBG__)
/* under construction !*/
#else
1,
#endif /* defined(__MODEM_3G_LOGGING__) && defined(_DSPIRDBG__) */
#endif /* __UL1_STANDALONE__ */
99, //TST-DSP
921600, //TST-DSP baudrate
0 // USB CD-ROM config, 0:CD-ROM , 1: COM
},
};
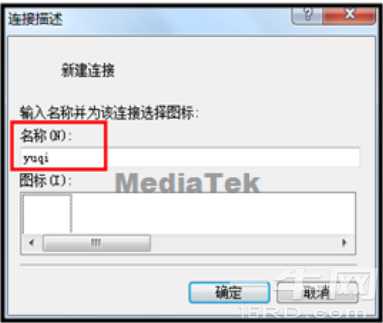
二、 PC 端配置:
打开超级终端,在 “ 名称 ” 中输入任意字符,点击 “ 确认 ” ;接着在 “ 连接时使用 ” 中选择对应的 COM 口,点击 “ 确认 ” ;然后在 “ 位 / 秒 ” 中配置与手机中一样的波特率 ( 如果是用 USB 连接的,可以不用修改 ) , “ 数据流控制 ” 选择无,点击 “ 确认 ” ;最后在弹出的窗口中就可以输入的自己需要测试的 AT 指令了。

介绍 Feature Phone 平台如何通过超级终端等其他串口工具,连接手机下 AT 命令
[SULIBTION]
超级终端等串口工具连接手机下AT命令,需要完成手机端配置和PC端配置两部分,方法如下:
一、 手机端配置有以下 3 种方法 ( 第 1 种最方便 ) :
1.直接在MMI设置(推荐,适用于具有MMI的项目):
输入*#3646633# ---->Device---->Set UART---->UART Setting---->PS Config,对PS Config进行配置,选择端口和波特率,点击save,save后会自动重启,手机端配置就完成了。
2. 直接使用 maui meta tool 修改 NVRAM_EF_PORT_SETTING_LID 的方法 ( 适用于没有 MMI 的项目) :
(1) maui meta tool 连接上手机后,选择 NVRAM Eidtor ,导入 database ,读出NVRAM_EF_PORT_SETTING_LID 。
(2)如果需要连接超级终端等串口工具,那么请将ps_port配成所需端口(端口对应如(4)),如使用USB1,配成0x04;将tst_port_ps和tst_port_l1配置为其他端口,或配成0x63(输入99),表示不配置端口。
(3) 如果需要连接 cather tool ,那么请将 tst_port_ps 和 tst_port_l1 配成所需端口 ( 必须是同一端口 ) ,如使用 USB1 ,需配成 0x04 ;将 ps_port 配置为其他端口,或者配成 0x63( 输入 99),表示不配置端口。
(4) 端口对应如下:
UART1-UART3:0-2
USB1:4
USB2:5
NONE:99(0x63)
注意:如果配置成UART口,注意波特率的设置,tst_port_ps和tst_port_l1对应的是tst_baudrate_ps和tst_baudrate_l1,ps_port对应的是ps_baudrate,PC端catcher tool或者超级终端在配置波特率的时候需要和手机端一致。如果是配置成USB口,可以不用关心波特率的问题。
3. 在代码中修改配置,再重新编译的方法 (适用于固定使用某个端口) :
可以修改文件nvram_common_config.c中NVRAM_EF_PORT_SETTING_DEFAULT的配置。
注意检查MMI版本和宏的开启情况。
static port_setting_struct const NVRAM_EF_PORT_SETTING_DEFAULT[]=
{
{
#if defined (WISDOM_MMI) || defined(NEPTUNE_MMI)
0, /* tst-ps uses uart_port2(value is 1) */
1, /* APP uses uart_port1 (value is 0) */
#elif defined(__USB_MULTIPLE_COMPORT_SUPPORT__) && defined(__L4_INIT_MULTIUSB_COM__)
0, /* TST-PS uses uart_port1 */
5, /* ATCI uses uart_port_usb2 */
#else
0, /* tst-ps uses uart_port_null(value is 99) */ //配置tst-ps 的port,用于连catcher抓
log,0表示uart1,1表示uart2,...依此类推,99表示none,和前面的第2点(4)一致
1, /* APP uses uart_port1 (value is 0) */ //配置ps的port,用于超级终端下AT命令
#endif
#if defined(EMPTY_MMI) //配置tst-ps的波特率,catcher的配置必须与此一致
921600, /* tst default baud rate for project without MMI */
#elif defined (WISDOM_MMI)
/* under construction !*/
#elif defined(__USB_MULTIPLE_COMPORT_SUPPORT__) && defined(__L4_INIT_MULTIUSB_COM__)
921600, /* TST-PS baud uses 921600 */
#else
115200, /* tst default baud rate base = 115200 = 0x0001C200 */
#endif
#if defined (__PS_SERVICE__) //配置ps的波特率,例如连超级终端下AT,超级终端com口的波特
率配置必须与此一致
961200, /* ps default baud rate base = 115200 = 0x0001C200 */
#else
57600, /* ps default baud rate base = 57600 = 0x0000E100 */
#endif
KAL_FALSE, /* High SpeedSIM */
0, /* SWDBG */
#if defined(__ONLY_ONE_UART__)
1, /* uart power setting (0x03) */
#else
3,
#endif
99, /* CTI uart port: uart_null (value is 0x63 (99) */
0, /* CTI baud rate: auto*/
#if defined (WISDOM_MMI) || defined(NEPTUNE_MMI)
0,
#elif defined(__USB_MULTIPLE_COMPORT_SUPPORT__) && defined(__L4_INIT_MULTIUSB_COM__)
1, /* TST-L1 baud uses uart_port2 */
#else
0, /* tst-l1 uart port, same as tst-ps*/ //配置tst-l1的port,与tst-ps的port一致
#endif
#if defined(EMPTY_MMI) //配置tst-l1的波特率,与tst-ps的波特率一致
921600, /* tst default baud rate for project without MMI */
#elif defined (WISDOM_MMI)
/* under construction !*/
#elif defined(__USB_MULTIPLE_COMPORT_SUPPORT__) && defined(__L4_INIT_MULTIUSB_COM__)
921600, /* TST-L1 baud uses 921600 */
#else
115200, /* tst default baud rate base = 115200 = 0x0001C200 */
#endif
0, /* tst output mode*/
#if !defined( __UL1_STANDALONE__ )
0, /* USB logging mode */
#else
#if defined(__Modem_3G_LOGGING__) && defined(_DSPIRDBG__)
/* under construction !*/
#else
1,
#endif /* defined(__MODEM_3G_LOGGING__) && defined(_DSPIRDBG__) */
#endif /* __UL1_STANDALONE__ */
99, //TST-DSP
921600, //TST-DSP baudrate
0 // USB CD-ROM config, 0:CD-ROM , 1: COM
},
};
二、 PC 端配置:
打开超级终端,在 “ 名称 ” 中输入任意字符,点击 “ 确认 ” ;接着在 “ 连接时使用 ” 中选择对应的 COM 口,点击 “ 确认 ” ;然后在 “ 位 / 秒 ” 中配置与手机中一样的波特率 ( 如果是用 USB 连接的,可以不用修改 ) , “ 数据流控制 ” 选择无,点击 “ 确认 ” ;最后在弹出的窗口中就可以输入的自己需要测试的 AT 指令了。