Amazon Iot物联网终端之廿六 采用AmazonIoT SDK for Python测试一个温度云监测的项目。
1. 项目介绍
这个项目是用于远程温度监测的项目,通过开发板采集温度传感器的温度数据,并通过订阅MQTT topic来上传到云端账号。对应于amazon开通一个和aws lambda驱动的语音入口UI,可以对这Amazon Echo说话,fetch temperature(取得温度),Echo音箱就会按照程序的编制取得对应的温度数据并用语音播报。
这个过程采用了MQTT订阅服务,在树莓派上测试过的,这个是在米尔板子上搭建了一个python环境并移植过来的。不过,目前echo只能支持英文,不能支持中文,所以只好用来测试。
这里的温度传感器数据采用虚拟数据,没有实际采集,因为暂时手头没有合适的独立温度传感器模块,相比树莓派,这个开发板还可以直接支持ADC采集的传感器,因此选择更多,可以用adafruit_BBIO.GPIO的ADC设置来采集。
在树莓派上的程序,需要下载amazon网站生成的公共证书CA,私有证书CA,和publicCA共3个CA,才能正确执行。这个部分属于AWS开发的过程。
2、简述AWS开发
- 登录AWS Console: https://aws.amazon.com/
- Navigate to AWS IoT

然后选择, “Create a Thing”.创建“CableTracer”.
然后创建证书, Certificate,下载所述public key, private key, 和certificate。并和这个项目关联。创建成功如下所示。
然后编制Lambda function,进入https://console.aws.amazon.com ,开始按步骤设置。
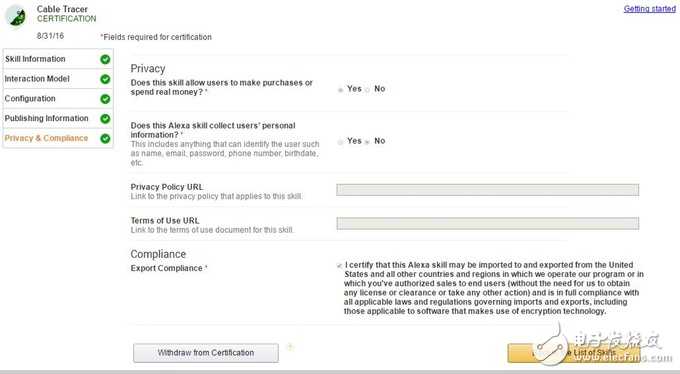
转到 https://developer.amazon.com/public/solutions/alexa/alexa-skills-kit
逐个设置
3. 开发板编程,
3.1 云端的node.js处理程序参考如下,主要是安全验证后,进行语音的识别和转换,
function onIntent(intentRequest, session )是其中的事件处理,对应于request,进行handle,
function buildSpeechletResponses()时生成语音模块的应答。
var awsIot = require('aws-iot-device-sdk');
var config = require("./config");
var deviceName = "CableTracer";
var mqtt_config = {
"keyPath": config.privateKey,
"certPath": config.certificate,
"caPath": config.rootCA,
"host": config.host,
"port": 8883,
"clientId": "Lambda-" + deviceName, //+ "-Lambda-" + (new Date().getTime()),
"region":"us-east-1",
"debug":true
};
var ctx = null;
var client = null;
// Route the incoming request based on type (LaunchRequest, IntentRequest, etc.) The JSON body of the request is provided in the event parameter.
exports.handler = function (event, context) {
try {
console.log("event.session.application.applicationId=" + event.session.application.applicationId);
ctx = context;
if (event.session.application.applicationId !== app_id) {
ctx.fail("Invalid Application ID");
}
client = awsIot.device(mqtt_config);
client.on("connect",function(){
console.log("Connected to AWS IoT");
// callback();
});
if (event.session.new) {
onSessionStarted({requestId: event.request.requestId}, event.session);
}
if (event.request.type === "LaunchRequest") {
onLaunch(event.request, event.session);
} else if (event.request.type === "IntentRequest") {
onIntent(event.request, event.session);
} else if (event.request.type === "SessionEndedRequest") {
onSessionEnded(event.request, event.session);
ctx.succeed();
}
} catch (e) {
console.log("EXCEPTION in handler: " + e);
ctx.fail("Exception: " + e);
}
};
/**
* Called when the session starts.
*/
function onSessionStarted(sessionStartedRequest, session) {
console.log("onSessionStarted requestId=" + sessionStartedRequest.requestId + ", sessionId=" + session.sessionId);
}
/**
* Called when the user launches the skill without specifying what they want.
*/
function onLaunch(launchRequest, session, callback) {
console.log("onLaunch requestId=" + launchRequest.requestId + ", sessionId=" + session.sessionId);
// Dispatch to your skill's launch.
getWelcomeResponse(callback);
}
/**
* Called when the user specifies an intent for this skill.
*/
function onIntent(intentRequest, session ) { //, callback) {
console.log("onIntent requestId=" + intentRequest.requestId + ", sessionId=" + session.sessionId);
var intent = intentRequest.intent,
intentName = intentRequest.intent.name;
console.log("REQUEST to string =" + JSON.stringify(intentRequest));
var callback = null;
// Dispatch to your skill's intent handlers
if ("Turn" === intentName) {
doTurnIntent(intent, session);
} else if ("Fetch" === intentName) {
doFetchIntent(intent, session);
} else if ("HelpIntent" === intentName) {
getWelcomeResponse();
} else {
throw "Invalid intent";
}
}
/**
* Called when the user ends the session.
* Is not called when the skill returns shouldEndSession=true.
*/
function onSessionEnded(sessionEndedRequest, session) {
console.log("onSessionEnded requestId=" + sessionEndedRequest.requestId + ", sessionId=" + session.sessionId);
// Add cleanup logic here
}
// --------------- Functions that control the skill's behavior -----------------------
function getWelcomeResponse() {
// If we wanted to initialize the session to have some attributes we could add those here.
var sessionAttributes = {};
var cardTitle = "Welcome";
var speechOutput = "Welcome to the Cable Tracer . ";
var shouldEndSession = false;
ctx.succeed(buildResponse(sessionAttributes, buildSpeechletResponse(cardTitle, speechOutput, repromptText, shouldEndSession)));
}
/**
* handles GO intent.
*/
function doTurnIntent(intent, session, callback) {
// OnGoing code for Turn based on
// mqttPublish() The codes send data to thingShadow, connection AWS IoT
}
function doFetchIntent(intent, session, callback) {
// OnGoing code for Turn based on
// mqttPublish() The codes send data to thingShadow, connection AWS IoT
}
function mqttPublish(intent, sessionAttributes, cardTitle, speechOutput, repromptText, shouldEndSession)
{
var strIntent = JSON.stringify(intent);
console.log("mqttPublish: INTENT text = " + strIntent);
// client.publish("cabletracer", strIntent, false);
client.publish(config.topic, strIntent, false);
client.end();
client.on("close", (function () {
console.log("MQTT CLIENT CLOSE - thinks it's done, successfully. ");
ctx.succeed(buildResponse(sessionAttributes, buildSpeechletResponse(cardTitle, speechOutput, repromptText, shouldEndSession)));
}));
client.on("error", (function (err, granted) {
console.log("MQTT CLIENT ERROR! " + err);
}));
}
// --------------- Helpers that build all of the responses -----------------------
function buildSpeechletResponse(title, output, repromptText, shouldEndSession) {
return {
outputSpeech: {
type: "PlainText",
text: output
},
card: {
type: "Simple",
title: title,
content: output
},
reprompt: {
outputSpeech: {
type: "PlainText",
text: repromptText
}
},
shouldEndSession: shouldEndSession
}
}
function buildResponse(sessionAttributes, speechletResponse) {
return {
version: "1.0",
sessionAttributes: sessionAttributes,
response: speechletResponse
}
}"""python C
3.2 实际的开发板上的程序,命名为aws.py,运行时为
python aws.py则启动了本程序。本ASK没有通过amazon的认证,所以还没有发布到amazon app store,只能在用本账户登录的Echo音箱,或者echosim.io网站上模拟测试,是语音交互的方式。
python语言交互性较好,不需要更多注释,可以直接读懂,
其中,
def do_fetch(voltage, current, temperature):
是其中关键的读取GPIO的函数,读出的数据作为publish的信息发布到MQTT的云端去。
ablot_cert,[size=1.4]
"""python Cable Tracer running on Raspberry Pi"""
import adafruit_BBIO.GPIO as GPIO
import paho.mqtt.client as mqtt
import json, math, time, sys, ssl
import logging, logging.handlers, traceback
cert_path = "/Home/certs/"
host = "/a1enbuzxyq4gt0.iot.us-east-1.amazonaws.com"
topic = "$aws/things/CableTracer/shadow/update"
root_cert = cert_path + "184db63325-public.pem"
cert_file = cert_path + "184db63325-certificate.pem.crt"
key_file = cert_path + "184db63325-private.pem.key"
globalmessage = "" # to send status back to MQTT -- voltage, current, temperature.
api = local_connect()
logger = logging.getLogger('cabletracer')
def do_turn(data): # {"name":"TurnIntent","slots":{"Onoff":{"name":"Onoff","value":"on"}}}
Onoff = str(data["slots"]["Onoff"]["value"])
logger.info("Onoff = " + onoff)
global globalmessage
if Onoff == "on":
globalmessage = "Turn On"
print globalmessage
cabletracer_onoff = TRUE
elif task == "off":
globalmessage = "Turn Off"
print globalmessage
cabletracer_onoff = FALSE
def do_fetch(voltage, current, temperature):
"""
Seting Pin in analogIn and read data with analogue shield, since GPIO in Raspberry can only read digital LOW and digital HIGH
"""
voltage = 1.0
current = 1.0
temperature =20
# voltage = GPIO.analogIn(9)
# current = GPIO.analogIn(10)
# temperature = rpi.analogIn(11)
return voltage, current, temperature
def logger_init():
logger.setLevel(logging.DEBUG)
log_file_size = 1024 * 1024 * 1 # 1 MB
formatter = logging.Formatter('%(asctime)s - %(levelname)s - %(process)d - %(name)s : %(message)s')
fh = logging.handlers.RotatingFileHandler('logs/echodronectl.log', maxBytes=log_file_size, backupCount=5)
fh.setFormatter(formatter)
sh = logging.StreamHandler(sys.stdout)
sh.setFormatter(formatter)
logger.addHandler(fh)
logger.addHandler(sh)
logger.info('******************************************')
logger.info('Starting up...')
logger_init()
logger.info('setting up mqtt client')
client = mqtt.Client(client_id="echodronectl.py")
logger.info('completed setting up mqtt client')
client.on_connect = on_connect
client.on_message = on_message
client.on_log = on_log
client.tls_set(root_cert,
certfile = cert_file,
keyfile = key_file,
tls_version=ssl.PROTOCOL_TLSv1_2,
ciphers=None)
client.connect(host, 8883, 60)
#client.loop_forever()
run = True
while run:
client.loop()
do_fetch()
do_turn()
time.sleep(1)
try:
mypayload = '''{
"Voltage": %s,
"Current": %s,
"Temperature": %s
}''' % (voltage, current, temperature,cabletracer_onoff, globalmessage)
client.publish(topic, mypayload)
except (TypeError):
pass
4、关于AWS开发是相对比较复杂的,对于其他的云端服务就相对容易得多。用简单API就可以实现,还可以在后台看到数据的历史记录。如果有时间,可以作为额外的对比内容。
lz这个项目介绍完了嘛?
也写了太多了,而且小编也催交作业了,近期不往下续写了,因为最近1个月要做其他的项目了。不过,围绕定制开发平台的测试才刚出发,还会把这个项目继续做下去的。
也写了太多了,而且小编也催交作业了,近期不往下续写了,因为最近1个月要做其他的项目了。不过,围绕定制开发平台的测试才刚出发,还会把这个项目继续做下去的。
看到论坛那些伪大神和马后炮我也是挺无奈的,实在看不下去,本身同根生,何必还要收费?大多数散户都没跑赢庄家,在这里我免费分享点个人多年珍藏的指标,互相交流,整体还是很实用。并且我的空间会分享每日大盘策略及荐股。欢迎交流!如果你觉得有问题,直接拉黑就行了。筘筘:201 925 567 验证113