PIC196F877A串口通信程序
注意:使用MPLAB IDE C语言编程时,自定义头文件要使用""包含不能使用<>
串口与单片机的连线原理图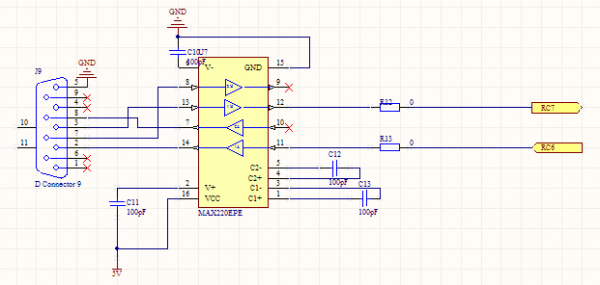
串口通信头文件
#ifndef T232_H
#define T232_H
#include "main.h"
//定义一帧的开始和结束
#define FRAME_BEGIN 0x28//开始帧标志
#define FRAME_END 0x29//结束帧标志
void init_232() ;
void send_str(const char *str) ;
char get_char() ;
void get_string(char *temp) ;
void put_char(char temp) ;
#endif
串行通信子程序
//基于TPDEM1,通过串口调试助手等串口观察软件观察程序,
//将TPDEM1通过ICD2配送的串口延长线与PC的串口连接,设置PC的串口为默认设置,如波特率9600,数据位8,无校验位,使用FIFO
#include "t232.h"
/*
*Function:init seriel port
*/
void init_232()
{
INTCON=0;
TRISC7=1; //RX置输入
TRISC6=0; //TX清成输出
RCSTA=0x90;//连续接受多位数据
TXSTA=0x24;
SPBRG=25; //9600=4000000/(16*(X+1))->X=25,high speed mode
// INTCON=0xC0;//开GIE,外围中断PEIE
//RCIE=1; //开接收中断
}
/*
*Fuction :send const string to seriel port
/
void send_str(const char *p)
{
while((*p)!=/0)
{
put_char(*p++) ;
}
}
/
Function:get charactor from serial port
*/
char get_char()
{
char temp ;
while(!RCIF) ; /* set when register is not empty */
temp = RCREG ;
return RCREG; /* RXD9 and FERR are gone now */
}
/*
*Function:send charactot to serial port
/
void put_char(char temp)
{
TXREG=temp ;
while(TRMT==0) ;
}
/*
*Function:get num bytes charactot
/
void get_string(char *t)
{
uchar i ;
char temp ;
//有可能接受一帧数据后因为去处理数据,导致接受下一帧数据失败
SPEN=1 ;//必须注意在连续接受完一帧数据时,一定要把这两位使能,
CREN=1 ;//我就是因为没有使能查了一上午的错,在找出错误所在;
while(1)
{
temp=get_char() ;
if(temp==FRAME_BEGIN)
{
i=0 ;
continue ;
}
if(temp==FRAME_END)
{
t[i]=/0 ;
break ;
}
t[i++]=temp ;
}
}
PIC196F877A串口通 相关文章:
- Windows CE 进程、线程和内存管理(11-09)
- RedHatLinux新手入门教程(5)(11-12)
- uClinux介绍(11-09)
- openwebmailV1.60安装教学(11-12)
- Linux嵌入式系统开发平台选型探讨(11-09)
- Windows CE 进程、线程和内存管理(二)(11-09)