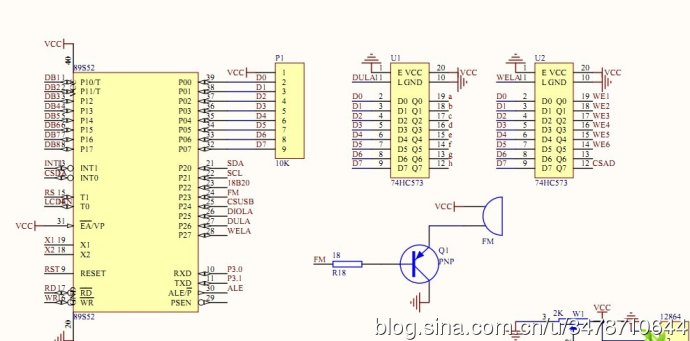
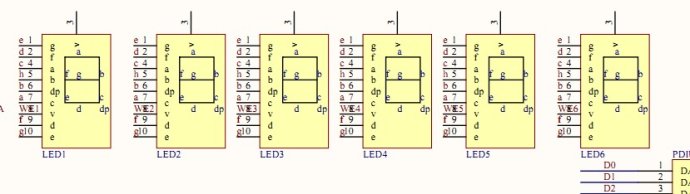
数码管显示在
51单片机里面也是很经典的历程。因为IO口有限,所以数码管的数据端口与选通端口使用了同样的IO端口,防止数据与选通信号混乱,这里使用了两个锁存器,用于区分选通信号与数据信号。在实际工程开发中,IO复用的情况还是很常见的,所以掌握复用IO的控制过程就显得很重要了。
原理图:
代码如下:详细说明见注释。
//在6个数码管上面显示数字0-6,时间间隔是1s。数码管1显示1,1S关闭,数码管2显示2,1S关闭~~~~~~~~~~
#include //头文件
#define uint unsigned int //定义宏--无符号整型
#define uchar unsigned char //定义宏--无符号字符型
sbit duanxuan=P2^6; //声明P2.6端口为段选端
sbit pianxuan=P2^7; //声明P2.7端口为片(位)选端
void delay_1s(uint); //声明延时函数--延时一秒
uint xs; //延时函数用
uchar code table[]={
0x3f,0x06,0x5b,0x4f,
0x66,0x6d,0x7d,0x07,
0x7f,0x6f,0x77,0x7c,
0x39,0x5e,0x79,0x71}; //C语言编码定义
void main() //主函数入口
{
xs=20; //参数越小,就可以实现6个数码管一起显示数字
while(1)
{
pianxuan=1; //打开片选锁存器
P0=0xfe; //执行片选,选择第1个数码管
pianxuan=0; //关闭锁存器,锁存器输出端保持不变
P0=0x00;
duanxuan=1; //打开段选端
P0=table[1]; //显示数字1
duanxuan=0; //关闭段选端,数字保持
delay_1s(xs); //延时xS
pianxuan=1;
P0=0xfd; //选择第2个数码管
pianxuan=0;
P0=0x00;
duanxuan=1;
P0=table[2]; //显示数字2
duanxuan=0;
delay_1s(xs);
pianxuan=1;
P0=0xfb; //选择第3个数码管
pianxuan=0;
P0=0x00;
duanxuan=1;
P0=table[3]; //显示数字3
duanxuan=0;
delay_1s(xs);
pianxuan=1;
P0=0xf7; //选择第4个数码管
pianxuan=0;
P0=0x00;
duanxuan=1;
P0=table[4]; //显示数字5
duanxuan=0;
delay_1s(xs);
pianxuan=1;
P0=0xef; //选择第5个数码管
pianxuan=0;
P0=0x00;
duanxuan=1;
P0=table[5]; //显示数字5
duanxuan=0;
delay_1s(xs);
pianxuan=1;
P0=0xdf; //选择第6个数码管
pianxuan=0;
P0=0x00;
delay_1s(xs);
duanxuan=1;
P0=table[6]; //显示数字6
duanxuan=0;
delay_1s(xs);
}
}
void delay_1s(uint xs) //延时函数主体
{
uint i,j;
for(i=xs;i>0;i--)
{
for(j=10;j>0;j--)
{
}
}
}
以上,数码管显示结束。