之开发基于Python的Sqlite3与socket套接字C/S架构程序
【创龙AM4379 Cortex-A9试用体验】之开发基于Python的Sqlite3与socket套接字C/S架构程序
在“【创龙AM4379Cortex-A9试用体验】之移植Python2.7与sqlite3到TL-4379”这篇试用报告中,我们移植了Sqlite3与Python2.7.3到创龙TL-4379开发板,移植的Python2.7.3支持import sqlite3和import socket,即当前的Python可以直接导入sqlite模块和socket模块,实现对本地sqlite3数据库操作,并且我们可以利用python优秀的网络开发特性,快速开发一个基于C/S架构的网络通讯程序。如果系统能够操作数据库,并能够根据客户端请求,TL-4379能够将本地的数据发送给客户端,这就达到了数据终端服务器的基本要求了。
我们这一篇试用报告在上一篇移植Python到TL-4379的基础上,开发两个小程序,进一步验证在TL4379开发板上运行Python程序可行性。
其中第一个程序测试基于Python的sqlite3数据库操作程序,分别操作存储在本地存储器上的数据库文件,和操作定义在内存中的数据库。
第二个测试程序为基于Python的采用socket套接字的C/S(Client/Server)工作模式的网络通讯程序,分别设计客户端程序和服务器端程序。
1. 基于Python的sqlite3测试程序
在Windows系统下通过记事本创建文件:testsqlite3.py
在该文件中创建4个函数:
sqlite_basic() //基本的建表、插入数据、查询数据
def sqlite_adv() //建表、输入数据、参数化查询数据
sqlite_adv2() //创建内存数据库、插入数据、查询数据
sqlite_adv3() //创建内存数据库、引入datetime、参数化更新、查询数据
程序源码如下:
import sqlite3
def sqlite_basic():
#Connect to db
conn = sqlite3.connect('test.db')
#create cursor
c= conn.cursor()
#Create table
c.execute('''
create table if not exists stocks
(date text, trans text, symboltext,
qty real, price real)
'''
)
#Insert a row of data
c.execute('''
insert into stocks
values('2006-01-05','BUY','REHT',100,35.14)
'''
)
#query the table
rows = c.execute("select *from stocks")
#print the table
for row in rows:
print(row)
#delete the row
c.execute("delete from stocks where symbol=='REHT'")
#Save (commit) the changes
conn.commit()
#Close the connection
conn.close()
def sqlite_adv():
conn = sqlite3.connect('test2.db')
c= conn.cursor()
c.execute('''
create table if not existsemployee
(id text, name text, age inteage)
''')
#insert many rows
for t in [('1', 'itech', 10),
('2', 'jason', 10),
('3', 'jack', 30),
]:
c.execute('insert into employee values (?,?,?)', t)
#create index
create_index = 'CREATE INDEX IF NOT EXISTS idx_id ON employee (id);'
c.execute(create_index)
#more secure
t= ('jason',)
c.execute('select * from employee where name=?', t)
#fetch query result
for row in c.fetchall():
print(row)
conn.commit()
conn.close()
def sqlite_adv2():
#memory db
con = sqlite3.connect(":memory:")
cur = con.cursor()
#execute sql
cur.executescript('''
create table book(
title,
author,
published
);
insert into book(title, author, published)
values (
'AAA book',
'Douglas Adams',
'china electronic'
);
''')
rows = cur.execute("select * from book")
for row in rows:
print("title:" + row[0])
print("author:" + row[1])
print("published:" + str(row[2]))
def sqlite_adv3():
import datetime
#Converting SQLite values to custom Python types
#Default adapters and converters for datetime and timestamp
con = sqlite3.connect(":memory:",detect_types=sqlite3.PARSE_DECLTYPES|sqlite3.PARSE_COLNAMES)
cur = con.cursor()
cur.execute("create table test(d date, ts timestamp)")
today = datetime.date.today()
now = datetime.datetime.now()
cur.execute("insert into test(d, ts) values (?, ?)", (today,now))
cur.execute("select d, ts from test")
row = cur.fetchone()
print today, "=>", row[0], type(row[0])
print now, "=>", row[1], type(row[1])
cur.execute('select current_date as "d [date]",current_timestamp as "ts [timestamp]" from test')
row = cur.fetchone()
print "current_date", row[0], type(row[0])
print "current_timestamp", row[1], type(row[1])
sqlite_basic()
sqlite_adv()
sqlite_adv2()
sqlite_adv3()
将上述testsqlite3.py拷贝到Ubuntu虚拟机的NFS共享目录下,启动TL-4379开发板,执行如下命令:
mount -t nfs 192.168.1.107:/nsfshare /mnt-o nolock
cd /mnt
./Python/_install/bin/python testsqlite3.py
结果如下图所示:

从命令行打印出的信息来看,与我们程序里固定编写的内容是一致的。
2. 基于Python的socket 服务器/客户端网络通信程序
我们采用C/S架构的开发模式,服务器端程序运行在TL-4379一侧,客户端程序运行在我的Ubuntu PC机一侧。
服务器实时监听客户端连接请求,当有客户端连接到服务器后,服务器端程序进入循环体中,等待客户端的命令请求,并更具客户端请求的命令,返回shell执行的结果给客户端。
客户端启动后,首先连接服务器,两者建立连接后,客户端等待用户输入命令,如“ls /dev/input”,用户输入命令后,客户端将命令数据发送的服务器端,服务器软件将命令结果返回给客户端,客户端回显数据。
2. 1服务器端程序
创建Python文件py_socket_server.py,代码如下:
import socket
import commands
HOST='192.168.1.107'
PORT=50007
s= socket.socket(socket.AF_INET,socket.SOCK_STREAM)
s.bind((HOST,PORT))
s.listen(1)
while 1:
conn,addr=s.accept()
print'Connected by',addr
while 1:
data=conn.recv(1024)
cmd_status,cmd_result=commands.getstatusoutput(data)
if len(cmd_result.strip()) ==0:
conn.sendall('Done.')
else:
conn.sendall(cmd_result)
conn.close()
2. 2客户端程序
创建Python文件py_socket_client.py,代码如下:
import socket
HOST='192.168.1.107'
PORT=50007
s=socket.socket(socket.AF_INET,socket.SOCK_STREAM)
s.connect((HOST,PORT))
while 1:
cmd=raw_input("Please input cmd:")
s.sendall(cmd)
data=s.recv(1024)
print data
s.close()
2. 3 测试
将两个文件拷贝到Ubuntu虚拟机的NFS共享目录,在TL-4379开发板中的挂载NFS,
mount -t nfs 192.168.1.107:/nfsshare /mnt-o nolock
cd /mnt
./Python/_install/bin/python py_socket_server.py
命令执行效果如下图所示:

此时服务器处于监听状态,等待客户端的连接请求。
在Ubuntu虚拟机上执行如下命令:
cd /nfsshare
python py_socket_client.py
命令执行结果如图所示:

从命令行反馈信息看,说明客户端已经与服务器建立了连接,客户端当前正在等待用户输入命令。
我们在再来看看服务器、客户端建立连接后,服务器端,即TL-4379开发板上的命令行信息如图所示:

服务器端把客户端的IP地址以及数据接收端口号也打印了出来。
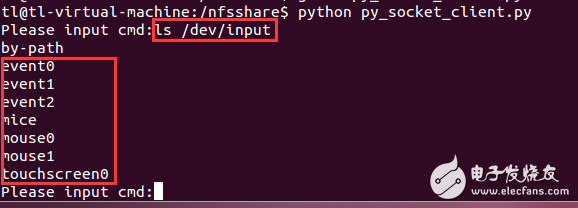
我们在Ubuntu虚拟机上输入shell命令:
ls /dev/input/
服务器返回的信息如图所示:

返回的信息正是TL-4379开发板上的/dev/input目录上的信息。
3 小结
通过两个小程序,验证了我们上一篇试用报告中将Python移植到TL-4379的正确性,我们可以直接把代码文件拷贝到Windwos、Linux桌面系统上,只有相应的系统安装了sqlite3和Python,就可以运行上述代码,测试功能,说明Python的跨平台、可移植性非常好。
看看,学习学习。
Python开发效率高,第三方库丰富,用在嵌入式环境中也是可行的
以前看一家日资企业招聘人做网络电话是就指明要求会Python脚本语言。
