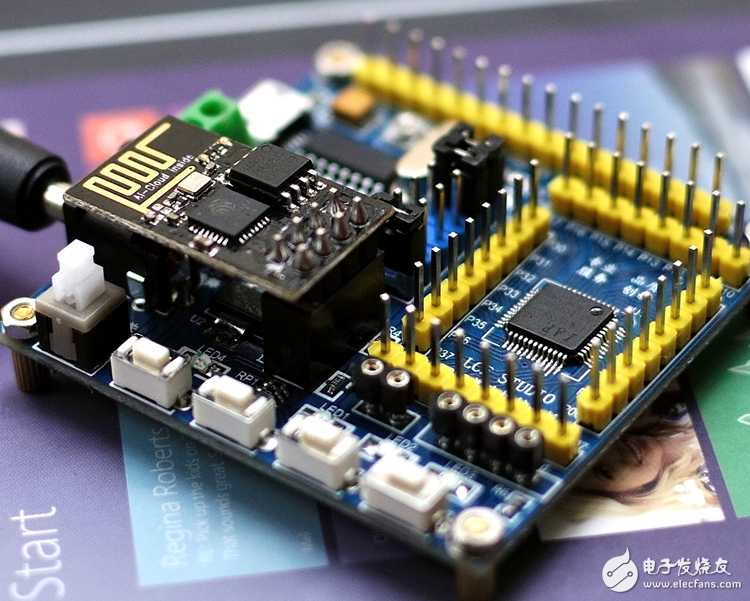
基于单片机IAP15W4K58S4的手机WIF连接控制(使用ESP8266 工作于AP+STATION模式)
程序名称:ESP8266 WiFi串口模块通信(18.432MHz)
功能说明: 1. 该程序将ESP8266设置为AP+STATION工作模式,并建立TCP 服务器,默认IP为192.168.4.1, 开放端口5000
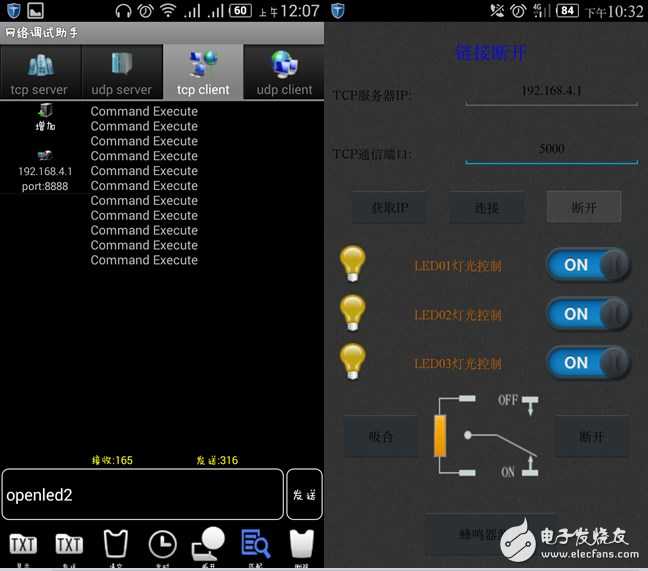
2. 测试手机打开WIFI后,搜索到ESP_***热点后,进行连接。
3. 打开安装在手机里的网络调试助手,通过TCP CLIENT的方式,与TCP服务器192.168.4.1,端口5000,进行连接。
4. 手机向TCP服务器发送控制指令,例如发送“ESPKLED1”后,将点亮LED1,同时模块返回“Command Executed”
注意:串口1和串口2共用一个buffer,当收到串口1的“ESPKLED1“,也将执行上述指令
因本程序作为测试用,将ESP8266设置为热点后, 该热点是不需要密码的。可能过"AT+CWSAP"设置密码
串口1和串口2波特率均为9600
传文件提示服务器内部错误,有需要的朋友留下邮箱哦,


#include "stc15f2k60s2.h" // 单片机STC15F2K60S2头文件,可以不再加入reg51.h
#include <intrins.h> // 加入此头文件后,可使用_nop_库函数
#include "delay.h" // 延时函数头文件
#include "uart.h" // 串行通信函数头文件
#include <string.h> // 加入此头文件后,可使用strstr库函数
//sbit RST = P2^6;
#define Buf_Max 50
unsigned char xdata Rec_Buf[Buf_Max];
unsigned char i = 0;
void CLR_Buf(void);
bit Hand(unsigned char *a);
sbit LED1 = P5^0; // 定义LED1为P5.0
sbit LED2 = P5^1; // 定义LED2为P5.1
sbit LED3 = P5^2; // 定义LED3为P5.2
sbit OP_relay = P3^5; // 定义光耦继电器控制I/O为P3.5
char code str1[]="AT\r\n"; // 联机指令,返回"OK"
char code str2[]="AT+CWMODE=3\r\n"; // 设置ESP8266的工作模式,返回"OK"或者"no change"
char code str3[]="AT+CWJAP=\"lces\",\"88518851\"\r\n"; // 连接到WiFi热点,lces为热点名称,88518851为密码;连接成功返回“OK”
char code str4[]="AT+CIFSR\r\n"; // 本机IP地址查询指令
char code str5[]="AT+CIPSTART=\"TCP\",\"192.168.191.1\",8234\r\n"; // 连接到TCP服务器,返回“Linked”
char code str6[]="AT+CIPSEND=6\r\n"; // 发送数据指令
char code str7[]="hello!\r\n"; // 数据内容
char code str8[]="AT+CIPSERVER=1,5000\r\n"; // 建立TCP服务器,开放端口8888
char code str9[]="AT+CIPMUX=1\r\n"; // 打开多连接
char code str10[]="AT+RST\r\n"; // 软件复位
char code str11[]="AT+CIPSEND=0,15\r\n"; // 发送数据指令,基于多路连接模式
char code str12[]="Command Executed!\r\n"; // 数据内容
void main() // 主函数
{
// bit Order_flag;
P1M0 = 0x00;
P1M1 = 0x00;
P3M0 = 0x00;
P3M1 = 0x00;
P5M0 = 0x00;
P5M1 = 0x00;
// RST = 1; // ESP8266复位功能脚,拉低会将ESP8266复位
UartInit(); // 初始化串口
ES = 1; // 串口1中断打开
IE2 = 0x01; // 串口2中断打开
EA = 1; // 总中断打开
DelayMS(1000); // 延时一段时间,让ESP8266启动
DelayUS(100);
U1SendString(Rec_Buf); // 将ESP8266启动信息通过串口1打印出
U1SendString("\r\n");
U1SendString("Welcome to LCE STUDIO, Please wait while we are getting the device ready\r\n");
CLR_Buf(); //清除缓存内容
while(!Hand("OK")) //判断是否握手成功,如果不成功延时一会,再发送AT握手指令
{
U2SendString(str1); //发送联机指令
DelayMS(500);
}
CLR_Buf(); //清除缓存内容
U1SendString("OK,Succeed Establish connection with ESP8266\r\n");
while(!(Hand("OK")|Hand("no change"))) //判断是否设置成功,如不成功,延时后再次发送
{
U2SendString(str2); //发送设置ESP8266工作模式指令
DelayMS(500);
}
if(Hand("OK"))
{
CLR_Buf();
U2SendString(str10);
DelayMS(500);
}
CLR_Buf();
U1SendString("OK,ESP8266 has been set as AP+Station Mode\r\n");
while(!Hand("OK"))
{
U2SendString(str9); //设置为多路连接
DelayMS(500);
}
CLR_Buf();
while(!Hand("OK")) // 建立TCP 服务器,并开放端口8888
{
U2SendString(str8);
DelayMS(500);
}
CLR_Buf();
while(!Hand("OK")) // 查询模块当前IP地址
{
U2SendString(str4);
DelayMS(500);
}
U1SendString(Rec_Buf);
U1SendString("Congratulations, Everything is set up! TCP sever:192.168.4.1, Port: 5000");
CLR_Buf();
while (1) // 主循环
{
// U1SendString(Rec_Buf); // 将ESP8266启动信息通过串口1打印出
// DelayMS(1000);
// DelayMS(1000);
if(Hand("ESPGLED1")) // 收到关闭LED1的指令
{
ES = 0;
IE2 = 0x00;
LED1 = 1;
CLR_Buf();
U1SendString("Command: Turn off LED1, Executed!\r\n");
ES = 1;
IE2 = 0x01;
}
else if(Hand("ESPKLED1")) // 收到关闭LED1的指令
{
ES = 0;
IE2 = 0x00;
LED1 = 0;
CLR_Buf();
U1SendString("Command: Turn on LED1, Executed!\r\n");
ES = 1;
IE2 = 0x01;
}
else if(Hand("ESPGLED2")) // 收到关闭LED1的指令
{
ES = 0;
IE2 = 0x00;
LED2 = 1;
CLR_Buf();
U1SendString("Command: Turn off LED1, Executed!\r\n");
ES = 1;
IE2 = 0x01;
}
else if(Hand("ESPKLED2")) // 收到关闭LED1的指令
{
ES = 0;
IE2 = 0x00;
LED2 = 0;
CLR_Buf();
U1SendString("Command: Turn on LED1, Executed!\r\n");
ES = 1;
IE2 = 0x01;
}
else if(Hand("ESPGLED3")) // 收到关闭LED1的指令
{
ES = 0;
IE2 = 0x00;
LED3 = 1;
CLR_Buf();
U1SendString("Command: Turn off LED1, Executed!\r\n");
ES = 1;
IE2 = 0x01;
}
else if(Hand("ESPKLED3")) // 收到关闭LED1的指令
{
ES = 0;
IE2 = 0x00;
LED3 = 0;
CLR_Buf();
U1SendString("Command: Turn on LED1, Executed!\r\n");
ES = 1;
IE2 = 0x01;
}
else if(Hand("ESPKJDQ1")) // 收到关闭LED1的指令
{
ES = 0;
IE2 = 0x00;
OP_relay = 0;
CLR_Buf();
U1SendString("Command: OP relay Enable, Executed!\r\n");
ES = 1;
IE2 = 0x01;
}
else if(Hand("ESPGJDQ1")) // 收到关闭LED1的指令
{
ES = 0;
IE2 = 0x00;
OP_relay = 1;
CLR_Buf();
U1SendString("Command: OP relay Disable, Executed!\r\n");
ES = 1;
IE2 = 0x01;
}
/*
if(Order_flag == 1)
{
while(!Hand("SEND OK")) //判断是否发送数据成功,如不成功,延时后再次发送
{
U2SendString(str11); //数据发送指令
DelayMS(100);
U2SendString(str12); //数据内容
DelayMS(500);
}
CLR_Buf();
Order_flag = 0;
}
*/
}
}
bit Hand(unsigned char *a)
{
if(strstr(Rec_Buf,a)!=NULL)
return 1;
else
return 0;
}
void CLR_Buf(void)
{
unsigned char k;
for(k=0;k<Buf_Max;k++)
{
Rec_Buf[k] = 0;
}
i = 0;
}
void Uart1() interrupt 4 using 1
{
ES = 0;
if (RI)
{
RI = 0; //清除RI位
Rec_Buf = SBUF;
i++;
if(i>Buf_Max)
{
i = 0;
}
}
if (TI)
{
TI = 0; //清除TI位
}
ES = 1;
}
void Uart2() interrupt 8 using 1
{
IE2 = 0x00;
if (S2CON & S2RI)
{
S2CON &= ~S2RI;
Rec_Buf = S2BUF;
i++;
if(i>Buf_Max)
{
i = 0;
}
}
if (S2CON & S2TI)
{
S2CON &= ~S2TI;
}
IE2 = 0x01;
}
基于单片机IAP15W4K58S4的手机WIF连接控制(使用ESP8266 工作于AP+STATION模式)
跪求源码,正在学这个,万分感谢小编 987277295@qq.com
跪求APP和源码,感谢大佬1368534126@qq.com
跪求APP和源码,感谢大佬
小编,求源码,感谢,496398097@qq.com
跪求大神源代码 360750553@qq.com
跪求源程序邮箱 谢啦961219648@qq.com
跪求源程序邮箱 谢啦 961219648@qq.com
跪求源程序邮箱18397778067@163.com 谢啦
有求于你,我的邮箱1126021604@qq.com,手机端程序连不上,连上也不能执行指令,把指令当成字符显示,不动作;电脑程序能执行,但是无法更改内部刷入的AP名称和密码,只能使用它自带的名字,没有密码,执行时显示已经更改好,at+rst重启动后,模块闪烁灯,失效。还得重新刷机才行
小编单片机上串口2在哪里
跪求 APP 和 源码 我做毕设想参考一下,谢谢小编。794079555@qq.com
跪求APP和源码,现在我也在做这个,真心谢谢 794079555@qq.com
跪求 APP 和 源码 我想看看 后参考一下谢谢小编 1209798877@qq.com
跪求 APP 和 源码 我想看看 后参考一下谢谢小编 1209798877@qq.com
跪求 APP 和 源码 我想看看 后参考一下谢谢小编 1209798877@qq.com
跪求 APP 和 源码 我想看看 后参考一下谢谢小编 1209798877@qq.com
跪求 APP 和 源码 我想看看 后参考一下谢谢小编 1209798877@qq.com
跪求 APP 和 源码 我想看看 后参考一下谢谢小编 1209798877@qq.com
