ESP8266的个人心得
时间:10-02
整理:3721RD
点击:
前段时间在学长那边顺了一块ESP8266的板子过来了,感觉还不错,现在留点记录避免后续忘记的当前的进度。
板子是基于esp8266的一块二次开发的板子,丝印说的名字叫nodemcu,顺手查一下发现nodemcu这个项目已经开源了,感谢大神们的无私奉献。个人感觉这个开发板有一个特别的亮点,就是在单片机上嵌入了脚本语言编程,使用的脚本语言是Lua(此处可以百度一下),Lua语言稍微了解了一下,感觉这个是脚本解释语言是相当的牛的,就nodemcu而言,用lua编写的代码直接通过串口或者其他途径传输到ESP8266内部,通过转换和解释就可以直接控制单片机(ESP8266)了。
NodeMCU节点连接到互联网,在NodeMCU中运行一个lua程序,在这个程序里面建立tcp client。该client连接到doit的yun服务器,实现与服务器的通信。
在doit yun服务器上,对lua源代码进行编辑,点击"run",即可将源代码下载到NodeMCU中。
在NodeMCU中,接收到来自服务器的lua源文件,将其保存成文件。并compile成lc文件运行。
要实现这个功能,首先要在NodeMCU中下载三个文件。分别是init.lua,sta.lua,yun.lua。
注意:yun端服务器和NodeMCU之间通信是靠deviceID来识别。本demo的deviceID为doitCar。你可以随意取一个自己喜欢的名字,并在yun.lua中将doitCar替换。
init.lua文件:
sta.lua文件:
yun.lua文件:
进入后,在编辑区域输入:
核心代码:
或者从http://www.mcunode.com/get-code获取自己的程序,然后输入id就可以控制了,跟你介绍的差不多吧,
当然也能在线下载文件:
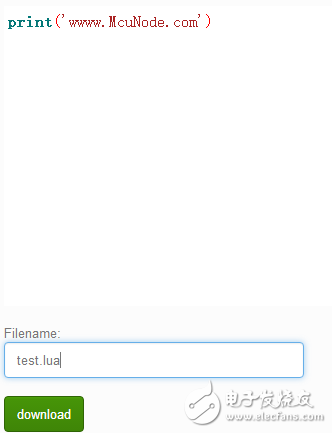
然后就比较好玩了,可以整天在线,哈哈!
板子是基于esp8266的一块二次开发的板子,丝印说的名字叫nodemcu,顺手查一下发现nodemcu这个项目已经开源了,感谢大神们的无私奉献。个人感觉这个开发板有一个特别的亮点,就是在单片机上嵌入了脚本语言编程,使用的脚本语言是Lua(此处可以百度一下),Lua语言稍微了解了一下,感觉这个是脚本解释语言是相当的牛的,就nodemcu而言,用lua编写的代码直接通过串口或者其他途径传输到ESP8266内部,通过转换和解释就可以直接控制单片机(ESP8266)了。
NodeMCU节点连接到互联网,在NodeMCU中运行一个lua程序,在这个程序里面建立tcp client。该client连接到doit的yun服务器,实现与服务器的通信。
在doit yun服务器上,对lua源代码进行编辑,点击"run",即可将源代码下载到NodeMCU中。
在NodeMCU中,接收到来自服务器的lua源文件,将其保存成文件。并compile成lc文件运行。
要实现这个功能,首先要在NodeMCU中下载三个文件。分别是init.lua,sta.lua,yun.lua。
注意:yun端服务器和NodeMCU之间通信是靠deviceID来识别。本demo的deviceID为doitCar。你可以随意取一个自己喜欢的名字,并在yun.lua中将doitCar替换。
init.lua文件:
- print("\n")
- print("ESP8266 Started")
- local exefile="sta"
- local luaFile = {exefile..".lua","yun.lua"}
- for i, f in ipairs(luaFile) do
- if file.open(f) then
- file.close()
- print("Compile File:"..f)
- node.compile(f)
- print("Remove File:"..f)
- file.remove(f)
- end
- end
- if file.open(exefile..".lc") then
- dofile(exefile..".lc")
- else
- print(exefile..".lc not exist")
- end
- exefile=nil;luaFile = nil
- collectgarbage()
sta.lua文件:
- print("Ready to Set up wifi mode")
- wifi.setmode(wifi.STATION)
- local ssid = "MERCURY_1013"--修改成自己路由器的SSID
- local psw = "123456789"--修改成自己路由器的密码
- print("Conneting to "..ssid)
- wifi.sta.config(ssid,psw)--ssid and password
- wifi.sta.connect()
- local cnt = 0
- gpio.mode(0,gpio.OUTPUT);
- tmr.alarm(3, 1000, 1, function()
- if (wifi.sta.getip() == nil) and (cnt < 20) then
- print("->")
- cnt = cnt + 1
- if cnt % 2 ==1 then
- gpio.write(0,gpio.HIGH);
- else
- gpio.write(0,gpio.LOW);
- end
- else
- tmr.stop(3)
- if (cnt < 20) then
- print("Config done, IP is "..wifi.sta.getip())
- cnt = nil;ssid=nil;psw=nil;
- collectgarbage();
- if file.open("yun.lc") then
- dofile("yun.lc")
- else
- print("yun.lc not exist")
- end
- else
- print("Wifi setup time more than 20s, Pls verify\r\nssid:"..ssid.." psw:"..psw.."\r\nThen re-download the file.")
- cnt=cnt+1;
- tmr.alarm(1, 300, 1, function()
- if cnt % 2 ==1 then
- gpio.write(0,gpio.HIGH);
- else
- gpio.write(0,gpio.LOW);
- end
- end)
- end
- end
- end)
yun.lua文件:
- --yun coding demo
- --Created @ 2015/05/27 by Doit Studio
- --Modified: null
- --http://www.doit.am/
- --http://www.smartarduino.com/
- --http://szdoit.taobao.com/
- --bbs: bbs.doit.am
- print("Start yun")
- gpio.mode(0,gpio.OUTPUT);--LED Light on
- gpio.write(0,gpio.LOW);
- local deviceID = "doitCar"
- local timeTickCnt = 0
- local fileName = "yunRemote"
- local conn;
- local flagClientTcpConnected=false;
- print("Start TCP Client");
- tmr.alarm(3, 5000, 1, function()
- if flagClientTcpConnected==true then
- timeTickCnt = timeTickCnt + 1;
- if timeTickCnt>=60 then --every 300 seconds send "cmd=keep\r\n" to server
- timeTickCnt = 0;
- conn:send("cmd=keep\r\n");
- end
- elseif flagClientTcpConnected==false then
- print("Try connect Server");
- conn=net.createConnection(net.TCP, false)
- conn:connect(7500,"182.92.178.210");
- conn:connect("connection",function(c)
- print("TCPClient:conneted to server");
- conn:send("cmd=subscribe&topic="..deviceID.."\r\n");
- flagClientTcpConnected = true;timeTickCnt = 0;
- end) --connection
- conn:connect("disconnection",function(c)
- flagClientTcpConnected = false;
- conn=nil;collectgarbage();
- end) --disconnection
- conn:connect("receive", function(conn, m)
- if string.sub(m,1,5)=="__B__" then
- file.remove(fileName..".lua")
- file.open(fileName..".lua", "w" )
- conn:send("cmd=next\r\n");--start fetching prog file
- elseif string.sub(m,1,5)=="__E__" then --finish fetching
- file.close()
- collectgarbage();
- node.compile(fileName..".lua");
- file.remove(fileName..".lua");
- dofile(fileName..".lc")
- else --the file context
- print("Recieve:"..m)
- file.writeline(m);
- conn:send("cmd=next\r\n");--continue fetching
- end
- collectgarbage();
- end)--receive
- end
- end)
进入后,在编辑区域输入:
- print("start flash led")
- cnt = 10
- while cnt>0 do
- gpio.write(0,gpio.LOW)
- tmr.delay(1000*1000) --1second
- gpio.write(0,gpio.HIGH)
- tmr.delay(1000*1000)--1second
- cnt = cnt - 1;
- end
- print("yun demo finish!")
大神是用的哪块板卡呢?
是一位学长送的nodemcu的板子。
嘿嘿。
看看,,,,,,
不错哦,买了板子但是没玩,一直在玩ESP-1s和ESP-12S
大妞啊,总结的不错哦
大神,我刚买了这块板,还没到手,但是完全小白,也不了解lua,但是两个月内要做出8266控制的毕业设计(本人只略懂一些C语言——谭浩强老师的功劳+一点51——郭天祥老师的功劳)请问大神当初是如何入手的,跪求经验分享!谢谢!
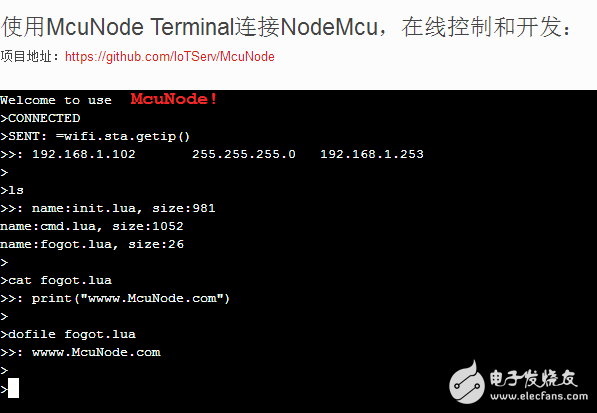
而我使用的是更加强大的McuNode云编程,原理都差不多,好处是集成了控制台Terminal,很强大,核心代码也很少
好了,分享一下吧!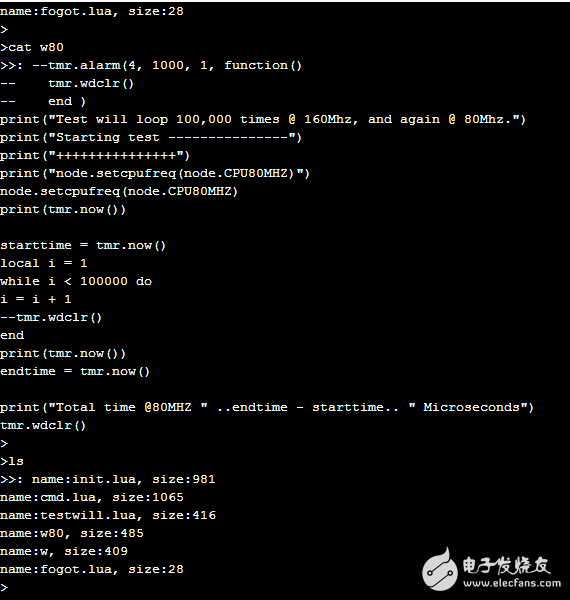
核心代码:
- id="wodeid" --you can set your id by youself!
- function startServer()
- print(wifi.sta.getip())
- sk=net.createConnection(net.TCP, 0)
- sk:on("receive", function(sck, c) node.input(c) end ) --print(c)
- sk:on("connection", function(sck, c)
- print(c)
- sk:send(id)
- tmr.alarm(2, 30000, 1, function()
- print(' ')
- end)
- function s_output(str)
- if (sk~=nil and str~='') then
- sk:send(str)
- end
- end
- node.output(s_output,1)
- end )
- sk:on("disconnection",function(conn,c)
- --node.output(nil)
- print('reconnect')
- sk:connect(8001,"www.mcunode.com")
- sk:send(id)
- end)
- sk:connect(8001,"www.mcunode.com")
- end
- wifi.setmode(wifi.STATION)
- wifi.sta.config("wifissid","wifipassword") --set your ap info !
- wifi.sta.autoconnect(1)
- tmr.alarm(1, 1000, 1, function()
- if wifi.sta.getip()==nil then
- print("Connect AP, Waiting...")
- else
- startServer()
- tmr.stop(1)
- end
- end)
或者从http://www.mcunode.com/get-code获取自己的程序,然后输入id就可以控制了,跟你介绍的差不多吧,
当然也能在线下载文件:
然后就比较好玩了,可以整天在线,哈哈!
你好,你知道
ESP8266——04的玩法吗?