流水灯入门之 STM32F429
在实现灯闪烁之前,安装MDK500遇到了很多问题,一个问题就是注册机有问题,无法破解,不过还是搞好了,还有一个问题就是pack installer更新无法更新到STM32F29, 不过去网上下载了一个mdkcm510.exe,之后行了,不知道什么原因。我比较懒,所以直接在官方的template上直接添加了流水灯的功能。
/**
******************************************************************************
*@file Template/main.c
*@author MCD Application Team
*@version V1.0.0
*@date 20-September-2013
*@brief Main program body
******************************************************************************
*@attention
*
*<h2><center>© COPYRIGHT 2013STMicroelectronics</center></h2>
*
*Licensed under MCD-ST Liberty SW License Agreement V2, (the"License");
*You may not use this file except in compliance with the License.
*You may obtain a copy of the License at:
*
* http://www.st.com/software_license_agreement_liberty_v2
*
*Unless required by applicable law or agreed to in writing, software
*distributed under the License is distributed on an "AS IS" BASIS,
*WITHOUT WARRANTIES OR CONDITIONS OF ANY KIND, either express or implied.
*See the License for the specific language governing permissions and
*limitations under the License.
*
******************************************************************************
*/
/*Includes ------------------------------------------------------------------*/
#include"main.h"
/**@addtogroup Template
*@{
*/
/*Private typedef -----------------------------------------------------------*/
/*Private define ------------------------------------------------------------*/
/*Private macro -------------------------------------------------------------*/
/*Private variables ---------------------------------------------------------*/
/*Private function prototypes -----------------------------------------------*/
/*Private functions ---------------------------------------------------------*/
/**
*@brief Main program
*@param None
*@retval None
*/
voidLEDInit(void)
{
GPIO_InitTypeDef GPIO_InitStructure; //定义一个GPIO变量
/*Enable the GPIO_LED Clock */
RCC_AHB1PeriphClockCmd(RCC_AHB1Periph_GPIOG, ENABLE);
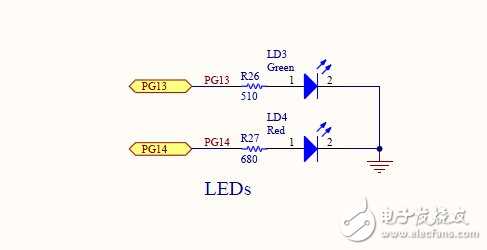
GPIO_InitStructure.GPIO_Pin= GPIO_Pin_13|GPIO_Pin_14; //因为LED3,LED4选择的事PIN13和PIN14
GPIO_InitStructure.GPIO_Mode= GPIO_Mode_OUT; //设置为输出模式
GPIO_InitStructure.GPIO_OType= GPIO_OType_PP; // 设置推挽输出
GPIO_InitStructure.GPIO_PuPd= GPIO_PuPd_UP; // 上拉
GPIO_InitStructure.GPIO_Speed= GPIO_Speed_100MHz; //GPIO速度
GPIO_Init(GPIOG,&GPIO_InitStructure); //初始化GPIOG
}
/**
*@brief Inserts a delay time.
*@param nCount: specifies the delay time length.
*@retval None
*/
staticvoid Delay(__IO uint32_t nCount)
{
/*Decrement nCount value */
while(nCount != 0)
{
nCount--;
}
}
intmain(void)
{
/*!<At this stage the microcontroller clock setting is already configured,
this is done through SystemInit() function which is calledfrom startup
files (startup_stm32f429_439xx.s) before to branch toapplication main.
To reconfigure the default setting of SystemInit()function, refer to
system_stm32f4xx.c file
*/
/*Add your application code here */
/*Infinite loop */
LEDInit();
while(1)
{
GPIO_ToggleBits(GPIOG,GPIO_Pin_13|GPIO_Pin_14);
/*Insert a delay */
Delay(0x3FFFFF);//这个延时一定要加,不然看不到灯闪烁的效果,我之前把这个时间搞小了,导致没有效果
}
}
#ifdef USE_FULL_ASSERT
/**
*@brief Reports the name of the source file and the source line number
* where the assert_param error has occurred.
*@param file: pointer to the source file name
*@param line: assert_param error line source number
*@retval None
*/
voidassert_failed(uint8_t* file, uint32_t line)
{
/*User can add his own implementation to report the file name and line number,
ex: printf("Wrong parameters value: file %s on line%d\r\n", file, line) */
/*Infinite loop */
while(1)
{
}
}
#endif
/**
*@}
*/
/************************(C) COPYRIGHT STMicroelectronics *****END OF FILE****/
最后看下效果

上面仅仅是闪烁,改成下面的代码就是真正的流水灯了
GPIO_WriteBit(GPIOG,GPIO_Pin_13,Bit_SET);
GPIO_WriteBit(GPIOG,GPIO_Pin_14,Bit_RESET);
/*Insert a delay */
Delay(0x3FFFFF);
Delay(0x3FFFFF);
Delay(0x3FFFFF);
Delay(0x3FFFFF);
GPIO_WriteBit(GPIOG,GPIO_Pin_14,Bit_SET);
GPIO_WriteBit(GPIOG,GPIO_Pin_13,Bit_RESET);
Delay(0x3FFFFF);
Delay(0x3FFFFF);
Delay(0x3FFFFF);
Delay(0x3FFFFF);