cc3220sf使用xds110串口烧录时为什么一点下载就会断开连接
自己照着官方的的原理图画了一块CC3220sf demo板,调试的时候烧不进程序。
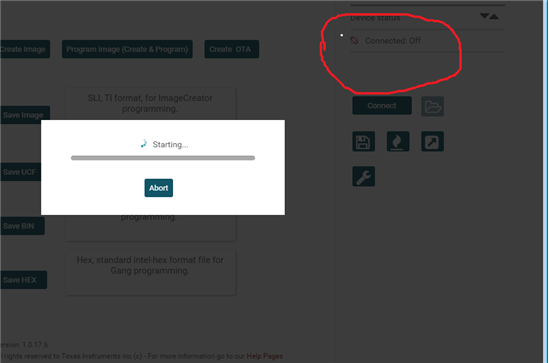
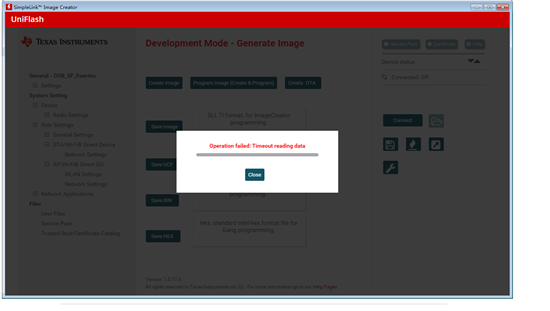
使用uniflash4.2 xds110 可以连接上,但是一点击下载就会断开连接。如下图
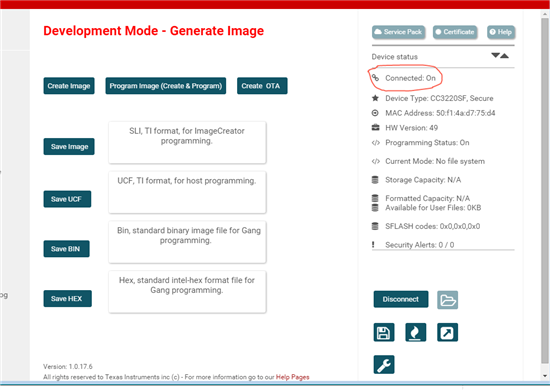
CC3220SFLaunchpad采用的XDS,上位机使用UniFlash 4.1,即SLImageCreator,Device可选择Launchpad On-Chip或Serial,或device On-Chip或Serial, SOP设置为010即可,但硬件接口除了TX,RX,还需要reset配合,所以推荐使用XDS110,既支持在线仿真,又可下载程序(连接TX,RX及Reset)。另外,CC3220SF除了下载bin和servicepack,还需要下载证书及key文件等。所以,用串口下载时,可下载由Image Creator导出的包含上述文件的.sli文件。
参考http://www.deyisupport.com/question_answer/wireless_connectivity/wifi/f/105/t/132055.aspx 最后的回复。
我使用的上位机是UniFlash4.1,sop也设置为010,使用的也是XDS110,reset也接了。Device选择了Serial,点击Connect设备是可以连接上,但是一点击Program Image (Create & Program)就会断开连接。
同样的操作,用官方的demo 板子,会出现这个问题么,
不会,但是有时官方的demo板子直接就连不上
Hi Dong lin,
首先你先用TI的CC3220SF的launchpad试一下,是否OK;能连接说明仿真器跟板子的硬件连接正常。
另外,你自己画的板子上有没有加Flash,Flash大小为多少?检查一下在UniFlash中Development Mode-General->Settings 里的Capacity的配置是否正确?
最后,你Uniflash的配置里,Flies里的安全文件有无正确配置,包括secure file以及Certificate file的配置,请按照uniflash 4.2 User‘s Guide 进行配置。
Hi Dong lin,
如何正确快速配置及应用CC3120/3220,可以参考如下附件。
Create Image Using UniFlash
a. Open on Uniflash v4.2
b. Select “CC3120/CC3220” device from “Enter Device Name” bar.
c. Verify “Serial (UART) Interface” is selected as a connection.
d. Click on “Start Image Creator” button
e. Click on “New Project” button to create new project.
f. Enter project name as “devkit_app” and select device type as “CC3220SF” and device mode as “Production”. Click on “Create Project” button to create project
g. Click on connect button to Connect to device.
h. Check if Connection status in On and Device Type as “CC3220SF, Secure”. If device is not secured then skip certificate related steps.
i. Select “Trusted Root Certificate Catalog” under “Files” section
j. Uncheck“Use default Trusted Root Certificate Catalog” option
k. Browse “Source File” to
“C:\TI\simplelink_cc32xx_sdk_1_02_02_00\tools\cc32xx_tools\certificateplayground\certcatalogPlayGround20160911.lst” file and “Signature Source File” to
“C:\TI\simplelink_cc32xx_sdk_1_02_02_00\tools\cc32xx_tools\certificateplayground\certcatalogPlayGround20160911.lst.signed.bin” file.
l. Select “Service Pack” under “Files” section
m. Browse “Service Pack FIle Name” to “C:\TI\simplelink_cc32xx_sdk_1_02_02_00\tools\cc32xx_tools\servicepackcc3x20\sp_3.2.0.0_2.0.0.0_2.2.0.4.bin”.
n. Select “User Files” under “Files” section
o. Click on add file icon
p. Browse to “C:\TI\simplelink_cc32xx_sdk_1_02_02_00\tools\cc32xx_tools\certificateplayground\dummy-root-ca-cert” to add file. After selection file configuration window will appear .
q. Select “Failsafe” option and click on Write button to add File to project.
r. Select “ Select MCU Image” option in “Action” dropdown menu.
s. Click on “Browse” button and navigate to devkit_app binary located at (Debug-“<PATH TO DEVKIT APP BUNDLE>\app\src\devkit_app\cc3220\CCS\Debug\devkit_app.bin” and Release-“<PATH TO DEVKIT APP
BUNDLE>\app\src\devkit_app\cc3220\CCS\Release\devkit_app.bin”
t. Select “Failsafe”, “Secure” and “Public Write” options
u. Select “Private Key File Name” from the drop down menu and browse to “C:\TI\simplelink_cc32xx_sdk_1_02_02_00\tools\cc32xx_tools\certificateplayground\dummy-root-ca-cert-key”.
v. Select “dummy-root-ca-cert” from “Certificate File name” dropdown menu.
w. Click on add file icon.
x. Add “ajax_script.js”, “arrayentlogo.png” and “index.html” (located at <DEVKIT RELEASE BUNDLE>/app/devkit_app/resources/arrayent) file using add button.
y. Click on “Generate Image” icon .
z. Click on “Create Image” button to generate Image.
aa. On successful Image generation “Operation Successfully Completed “ Message will pop up. Click on close button to close the popup.
bb. Click on “Save Image” to store “.sli” file to local storage.
cc. Click in “Program Image(Create & Program)” button to Create and Program Image to device.
dd. On successful flash image to device, “Programming Complete” message will appear
4011.TI-CC3220-DevKit-Quick-Start-Guide_G1pr.pdf
关键是无法connect to device啊,这个问题怎么办啊?