CC3200空芯片烧写问题
大家好,我手上有cc3200-LAUNCHXL板,板载CC3200正常烧写和调试,但是我现在手上的空CC3200芯片怎么利用这块板进行烧写代码,求具体的电路图和详细指导,谢谢!
如果是烧写程序到CC3200中,需要将CC3200的SOP设为100,具体的SOP的含义可以参考CC3200的数据手册,设置为SOP后上电CC3200默认通过UART0进行加载下载的程序,此时通过UART-USB的工具就可以通过Uniflash进行串口的程序烧写。
关于CC31xx & CC32xx UniFlash的简要介绍如下:
http://processors.wiki.ti.com/index.php/CC31xx_%26_CC32xx_UniFlash#Image_Creation_and_Programming
Main Screen
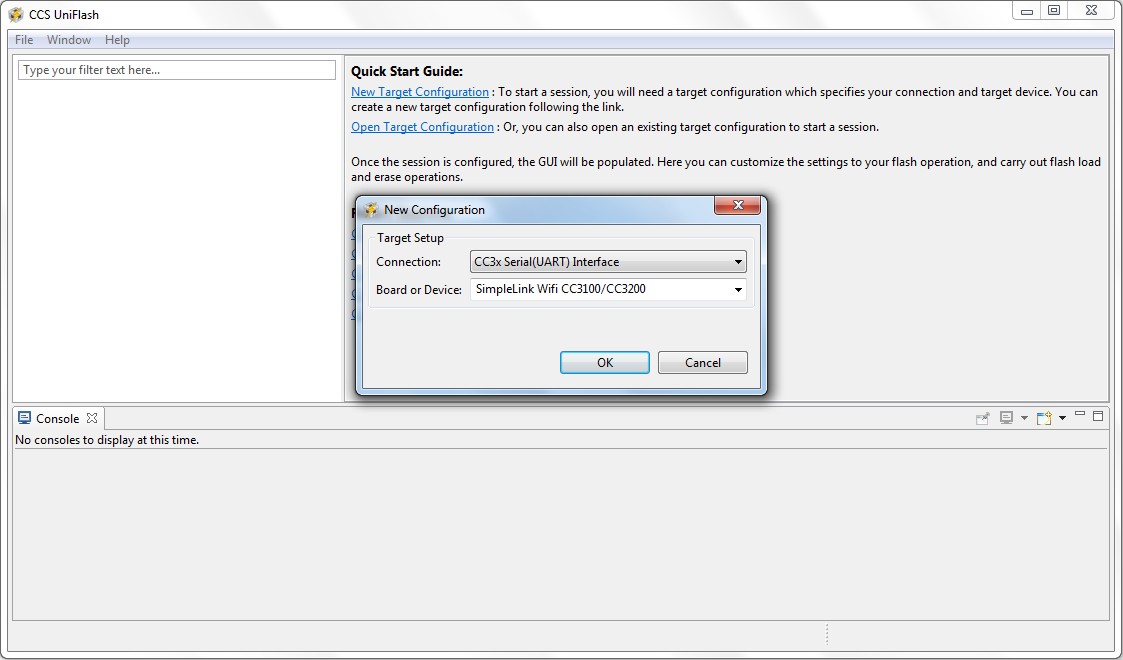
Upon running the Uniflash, the user is required to choose the target setup. The target setup may be configured via the top bar by file->New Configuration or via the Quick Start Guide on the main screen by clicking New target configuration. Currently, the Connection is set to CC3x Serial(UART) Interface and the Board or Device is set to SimpleLink WiFi CC3100/CC3200.
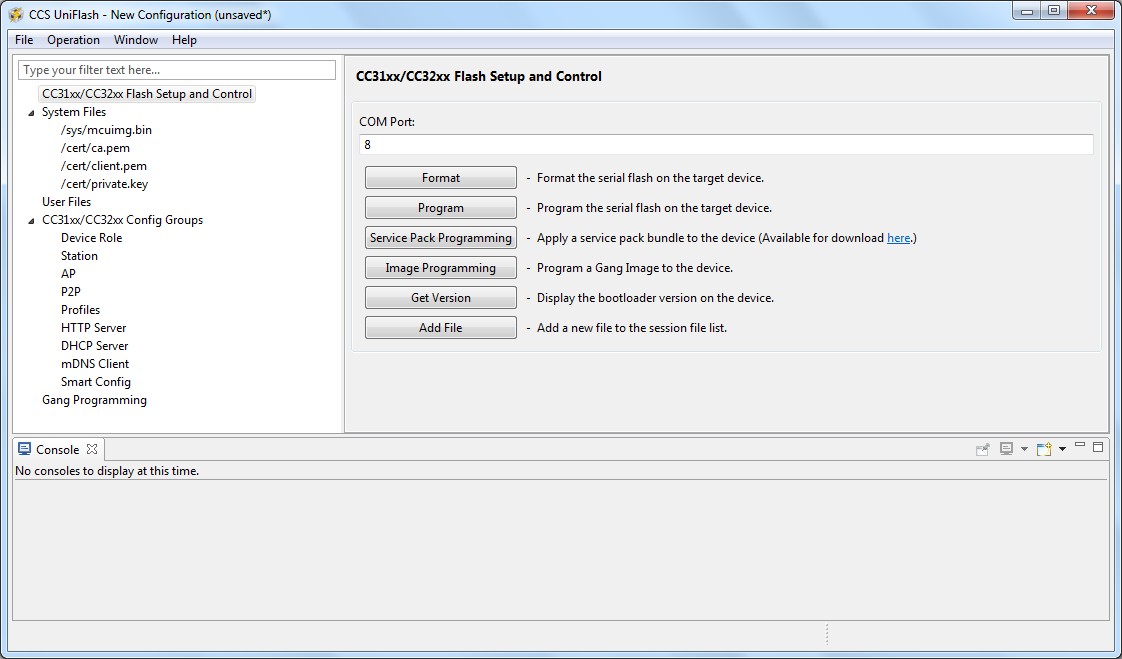
Loading the target configuration provides the Uniflash main screen.
The main screen is divided into 3 main sub screens.
- Uniflash main view: this is the upper left section on Main screen screen. All the presented data is parsed from the template XML and presented in a list form. The list is the list of target filenames.
- CC31x Flash Setup and Control: this is the upper right section on Main screen screen. It details the configurable options for each of the files chosen on the Uniflash main view. It also provides interface connection to the target device and buttons options (highlighted in next paragraphs).
- Console: this is a status window. Detailed information is printed during interaction with the device.
Target connection
Connection to the target device is via UART interface. The user should configure the COM port number and the baud rate. Currently, no automatic detection of COM port is supported and the baud rate supported is 921,600 only.
The COM port number needs to be fetched from the 'Windows Device Manager'. Idially, all FTDI chipsets on the evaluation boards are pre-flashed. However, FTDI chipsets that are not flashed for some reason, can still be used as Uniflash requires a simple COM port.
The following table describes all possible permutations:
| Evaluation board | FTDI | #COM ports | #COM port for flashing |
|---|---|---|---|
| CC3200 LaunchPad | pre-flashed FTDI | 1 | the only COM port exposed |
| CC3200 LaunchPad | non flashed FTDI | 2 | the upper COM port |
| CC3100 BoosterPack | pre-flashed FTDI | 2 | the lower COM port |
| CC3100 BoosterPack | non flashed FTDI | 4 | the 3rd COM port |
In addition, CC3200 LaunchPad can be made to work in two modes, functional mode and UART load mode.
UART load mode is to be used when flashing the device. This mode is selected by connecting "SOP2" jumper on J15 (denotes on PCB as '100:FLASH').
Format
If you are using pre-production CC3200 Launch Pad with XCC3101GZ or XCC3200HZ and you are using Uniflash version v3.2.0.00123 or earlier, the device must not get formatted as secured.
Uniflash version which is newer than v3.2.0.00123 does not have the option to set the format as secured.
The user is required to choose the capacity storage. It is the responsibility of the user to choose a capacity less to or equal the total size of the serial flash. The options are: [512KB, 1MB, 2MB, 4MB, 8MB and 16MB].
Note: choosing a lower size than the actual size results only in not using the entire space (but no unexpected behaviors). However, choosing a higher size than the actual size may result in unexpected behaviors.

Get Version
The version that can be fetched from the device is the bootloader version (as Uniflash interacts with the boot loader section). Additionally, the chipset version is fetched. The bootloader version is composed of 4 numbers, separated by periods.
The syntax is:
< SoftwareMajor.SoftwareMinor.SoftwareVersion.SoftwareSubVersion>
Please note that the boot loader version fetched is the one that is located in ROM.

As can be seen on Get Version screen, invoking 'Get Version' results in version 2.0.4.0 printed on the 'Console' sub screen.
File Programming
General
Programming of the device is applied upon pressing the 'Program' button. Another way is from the top bar by clicking Operation->Program. Upon pressing the 'Program' button, Uniflash utility scans all target filenames and configuration groups listed and applies the followings (ordered):
- each file with the 'erase' argument set to True is erased from the device
- each file with the 'update' argument set to True is flashed to the device
- each file with the 'verify' argument set to True is verified by reading it back from the device
Note that the files are scanned top-down as appears on the Uniflash main view screen.
Uniflash does not do conversions for binary-to-text encoded files (e.g. hex, Base64).
Non-secured file programming
Non secured file programming may be applied on a secured device as well. The only option under 'mode' for a non secured file is rollback option.
The relevant configuration is listed below:
- Name: target file name. System filenames cannot be modified whereas user filenames may be modified by the user.
- Mode: nothing is checked, indicates non secured file. Only rollback may be checked.
- MaxSize: 0 to indicate the original file size. User may configure a file size larger than the original if it is desired to save space for future appending.
- Url: full path where the file is located.
- Update checkbox: checked for flashing
- Verify checkbox: checked for flashing verification
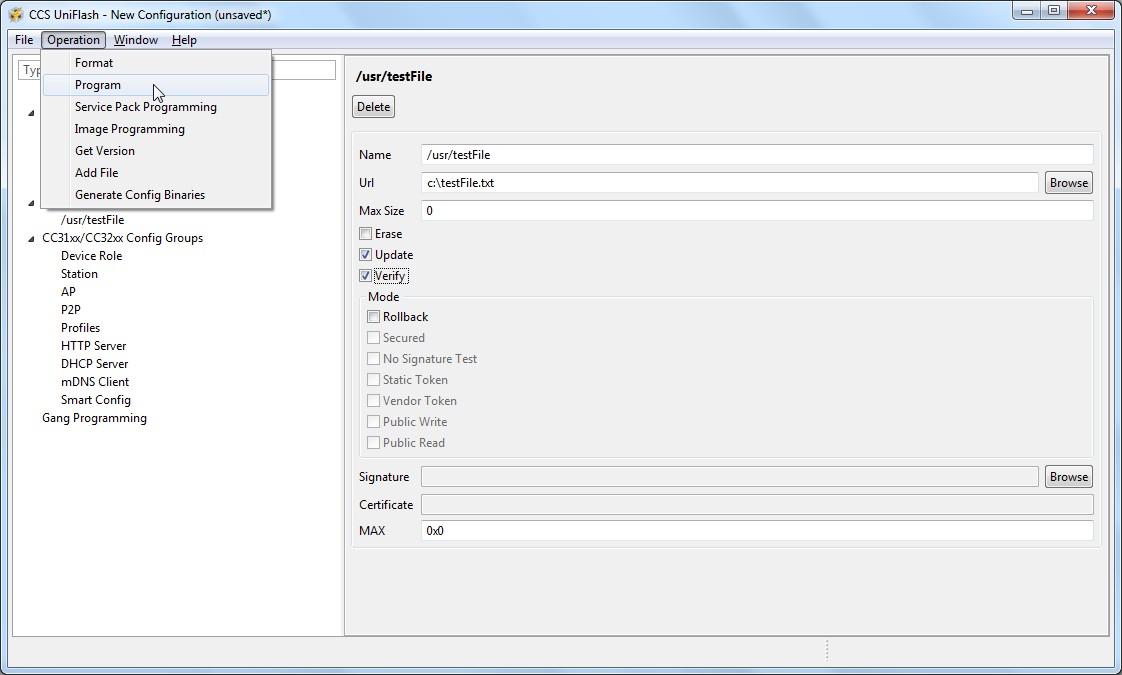
Upon pressing the 'Program' button, the file is flashed. The progress bar is updated frequently and messages are printed on the 'Console' sub screen.
Secured file programming
See Secured File System support paragraph. Uniflash version v3.2.0.00123 supported security configuration options per file but this feature is deprecated from Uniflash until devices support this feature.
All security configuration options still appear on Uniflash GUI but greyed out.
Service Pack Programing
General
Service pack is a common name for the image required for updating the device (either upgrade or downgrade the device). The service pack is a single file containing images for all flavors of the device, regardless if it is CC3100/CC3200 or ROM/Flash device. The detection is done automatically by Uniflash.
The service pack binary file is not part of Uniflash and should be fetched from TI repository separately.
Procedure
Please follow the ordered steps below for successful update procedure:
- 1.Format the device prior to flashing. This step is essential and should be performed at least once. With next service pack updates, format operation would not be required. Please follow Format paragraph for more details.
- 2.Invoke the Service Pack Update from a dedicated button or from the Operation->Service Pack Programming option in the top menu
- 3.Choose the binary servicepack file and click OK
- 4.Flashing should begin and the version flashed is printed just before flashing is started
