用户试用分享篇-TI-RTOS按键实现以及消息机制及同步对象
本文包含以下内容:
1、基于TI-RTOS的线程创建
2、按键扫描的实现(短按、长按)
3、消息队列与同步对象
使用的例程:
C:\ti\CC3200SDK_1.2.0\cc3200-sdk\example\getting_started_with_wlan_station
我预先把TI例程创建的station给注释掉了~(仅仅为了测试~)
#if 0
//
// Start the WlanStationMode task
//
lRetVal = osi_TaskCreate( WlanStationMode,\
(const signedchar*)"Wlan Station Task", \
OSI_STACK_SIZE,NULL, 1, NULL );
if(lRetVal < 0)
{
ERR_PRINT(lRetVal);
LOOP_FOREVER();
}
#endif
TI-RTOS线程创建~
用到的API
OsiReturnVal_eosi_TaskCreate(P_OSI_TASK_ENTRY pEntry,const signed char * constpcName,unsigned short usStackDepth,void *pvParameters,unsigned longuxPriority,OsiTaskHandle *pTaskHandle);
传入参数:
\param pEntry - pointerto the Task Function , 任务函数名
\param pEntry - pointerto the Task Function , 任务名称(取值随意)
\param usStackDepth - StackSize Stack Size in 32-bit long words , 任务栈深度(即你该任务所使用到的内存大小大致会有多大)
\param pvParameters - pointerto structure to be passed to the Task Function , 传给该函数的指针
\param uxPriority - TaskPriority , 任务优先级
返回0即表示任务创建成功
示例代码:
lRetVal =osi_TaskCreate( UserFunction, \
(const signedchar*)"User Application Task", \
OSI_STACK_SIZE,NULL, 3, NULL );
if(lRetVal < 0)
{
ERR_PRINT(lRetVal);
LOOP_FOREVER();
}
(注:一定要对返回值进行判断,这样才能确保创建是否成功,如果返回非零 返回的错误代码可参看osi.h:
typedef enum
{
OSI_OK = 0,
OSI_FAILURE = -1,
OSI_OPERATION_FAILED = -2,
OSI_ABORTED = -3,
OSI_INVALID_PARAMS = -4,
OSI_MEMORY_ALLOCATION_FAILURE = -5,
OSI_TIMEOUT = -6,
OSI_EVENTS_IN_USE = -7,
OSI_EVENT_OPEARTION_FAILURE = -8
}OsiReturnVal_e;
自己添加的函数:
void UserFunction(void *pvParameters )
{
MESSAGE msg;
while(1)
{
UART_PRINT("UserFunction run\r\n");
osi_Sleep(1000);
}
}
以上一个线程创建完毕~,(在此可以使用uart打印消息来查看是否程序执行了~debug x下,每1s打印一次UserFunctionrun 的提示~说明线程创建完毕)。
大家可以多写其他线程来试试~~~
按键扫描实现~
独立按键,采用定时扫描IO口的方式。
前面一章有介绍IO口的初始化,不多说,看代码:
void KeyPadInit()
{
// Enable clock ... gpio 13 and gpio 22
MAP_PRCMPeripheralClkEnable(PRCM_GPIOA2,PRCM_RUN_MODE_CLK);
MAP_PRCMPeripheralClkEnable(PRCM_GPIOA3,PRCM_RUN_MODE_CLK);
// Configure PIN_02 for GPIOOutput
MAP_PinTypeGPIO(PIN_15, PIN_MODE_0, false);
MAP_GPIODirModeSet(GPIOA1_BASE, GPIO_PIN_5,GPIO_DIR_MODE_IN); // gpio13 -- pin15
MAP_PinTypeGPIO(PIN_04, PIN_MODE_0, false);
MAP_GPIODirModeSet(GPIOA2_BASE, GPIO_PIN_6,GPIO_DIR_MODE_IN); // gpio22 -- pin04
}
// 扫描两个IO口的高低变化,有按键按下返回非零~
int KeyPadScan(void)
{
int key = 0;
if( GPIOPinRead(GPIOA2_BASE,GPIO_PIN_6) )
key = key | 0x01;
key = key << 1;
if( GPIOPinRead(GPIOA1_BASE,GPIO_PIN_5) )
key = key | 0x01;
return key;
}
有RTOS干脆创建个线程来扫描按键好了~~贴代码~:
大致流程如下:每20ms检测一次IO口,如果一个或者多个按键按下那么KeyValue = KeyPadScan();
得到的值不为0计数值count+1,当count大于最小的检测值时(消抖)当成一次短按出现~串口打印相关信息
,当按键持续按下且时间超过长按的计数值则串口打印一次长按消息,当按键弹起打印按键弹起消息~。详细看上传的工程。
lRetVal =osi_TaskCreate( KeyDetectFunction, \
(const signedchar*)"User Key Detect Task", \
OSI_STACK_SIZE,NULL, 2, NULL );
if(lRetVal < 0)
{
ERR_PRINT(lRetVal);
LOOP_FOREVER();
}
voidKeyDetectFunction( void *pvParameters )
{
static unsigned int Count = 0;
static KEY_TYPE KeyState = KEY_IDLE;
static unsigned int KeyValue = 0;
static unsigned int tKey = 0;
MESSAGE tMSG;
unsigned char ch[10];
memset(ch,0xaa,sizeof(ch));
ch[9] = 0xbb;
tMSG.uMsg = MESSAGE_KEYDOWN;
while(1)
{
KeyValue= KeyPadScan();
if(0!= KeyValue)
{
Count ++;
if(Count >= KEY_MIN_DETECT_TIME&& KeyState == KEY_IDLE)
{
// post short key press message
KeyState = KEY_PRESS_100MS;
UART_PRINT("Key short press%x \r\n",KeyValue);
tKey = KeyValue;
}
if(Count >= KEY_LONG_DETECT_TIME&& KeyState == KEY_PRESS_100MS)
{
KeyState = KEY_PRESS_1S;
UART_PRINT("Key long press%x \r\n",KeyValue);
tKey = KeyValue;
}
if(Count >= MAX_PRESS_TIME)
{ // ERROR ~
KeyState = KEY_IDLE;
}
}
else
{
if(KeyState != KEY_IDLE)
{
KeyState = (KeyState ==KEY_PRESS_100MS) ? KEY_100MS_RELEASE : KEY_1S_RELEASE;
KeyValue = tKey;
UART_PRINT("Key release %x\r\n",KeyValue);
KeyState = KEY_IDLE;
}
Count = 0;
}
osi_Sleep(20);
}
}
以上~按键的检测部分完成,当然接下去是要抛消息给其他线程让其他线程来执行咯~
消息队列与同步对象
用到的API 摘抄自osi.h文件
OsiReturnVal_e osi_SyncObjCreate(OsiSyncObj_t* pSyncObj); //同步对象的创建~This function deletes a sync object
OsiReturnVal_e osi_SyncObjWait(OsiSyncObj_t* pSyncObj , OsiTime_tTimeout); // 等待同步对象This function waits for a sync signal of the specific syncobject
OsiReturnVal_e osi_SyncObjSignalFromISR(OsiSyncObj_t* pSyncObj);//产生同步对象 (ISR中使用)This function generates a sync signalfor the object. from ISR context.
OsiReturnVal_e osi_SyncObjSignal(OsiSyncObj_t* pSyncObj); // 产生同步对象,非ISR中使用。This function generates a sync signal for the object.
示例:
上面创建了个检测按键的任务,当有按键按下时就产生一次同步对象~再创建另一个线程用于等待同步对象~一旦有按键产生可通过串口将数据打印出来~。(详细看代码)。
要注意的地方:同样每个函数都有返回值,最好做返回值检测,才能更好的解决问题)。
消息队列
用到的API摘抄自osi.h文件
OsiReturnVal_e osi_MsgQCreate(OsiMsgQ_t* pMsgQ, ……. // 创建消息 This function creates a message queuethat is typically used for inter thread communication.
OsiReturnVal_e osi_MsgQWrite(OsiMsgQ_t* pMsgQ, void* pMsg ,OsiTime_t Timeout); // 发送消息 This functionwrites a message to a specific message queue.
OsiReturnVal_e osi_MsgQRead(OsiMsgQ_t* pMsgQ, void* pMsg , OsiTime_tTimeout);// 接收消息 This functionretrieves a message from the specified message queue.
比如创建消息代码如下:12代表12个字节~,10代表总共可以一口气发送10次消息(类似有个缓存)。
lRetVal =osi_MsgQCreate(&keyMsg,"key MSG ",12,10);
if(lRetVal < 0)
{
ERR_PRINT(lRetVal);
LOOP_FOREVER();
}
osi_MsgQWrite(OsiMsgQ_t* pMsgQ, void* pMsg , OsiTime_t Timeout); 关于这个pMsg,此msg为指针,指向的大小为上面创建msg的大小(12)。也就是一个消息可以存放12个字节。
osi_MsgQRead 时,pMsg指向的是一个12字节的内存区域。
综合以上,我修改了例程,创建了个线程用于检测按键,有按键触发即产生同步对象以及将按键消息送入消息队列。
再另一个线程用于等待同步对象,并接收消息,解析消息,对相应按键进行处理(通过按键打印出来)。
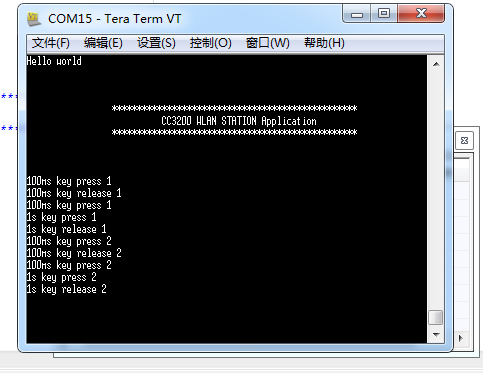
详细代码看附件,运行效果:短按sw2,sw3以及长按sw2,,sw3

以上就是TI-RTOS提供的部分API简单示例~
