avrdude实现8051芯片烧录
时间:10-02
整理:3721RD
点击:
avrdude实现Linux下8051芯片烧录希望对新手有帮助.
前提要有一个usbasp下载器。
http://www.fischl.de/usbasp/ 这是他的网站,在taobao上也有卖。
然后编辑avrdude.conf:
在最后面加入AT89s52的相关信息
然后保存
现在就可以烧录AT89S52的单片机了,
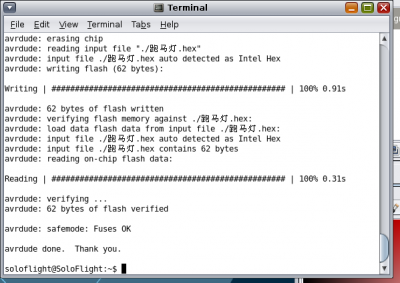
例如我想烧录放在桌面上的编译好的跑马灯程序,
用命令


前提要有一个usbasp下载器。
http://www.fischl.de/usbasp/ 这是他的网站,在taobao上也有卖。
- sudo apt-get install avrdude
然后编辑avrdude.conf:
- sudo gedit /etc/avrdude.conf
在最后面加入AT89s52的相关信息
- [/font]
- [font=Arial]#------------------------------------------------------------[/font]
- [font=Arial]# Below chips by added by me .. [/font]
- [font=Arial]# these chips can be programmed with my usbasp programmer(changed atmega8 program)[/font]
- [font=Arial]# after adding avrdude support in this file ..[/font]
- [font=Arial]#------------------------------------------------------------[/font]
- [font=Arial]#------------------------------------------------------------[/font]
- [font=Arial]# AT89S52[/font]
- [font=Arial]#------------------------------------------------------------[/font]
- [font=Arial]part[/font]
- [font=Arial]id = "8052";[/font]
- [font=Arial]desc = "AT89S52";[/font]
- [font=Arial]signature = 0x1E 0x52 0x06;[/font]
- [font=Arial]chip_erase_delay = 20000;[/font]
- [font=Arial]pgm_enable = "1 0 1 0 1 1 0 0 0 1 0 1 0 0 1 1",[/font]
- [font=Arial]"x x x x x x x x x x x x x x x x";[/font]
- [font=Arial]chip_erase = "1 0 1 0 1 1 0 0 1 0 0 x x x x x",[/font]
- [font=Arial]"x x x x x x x x x x x x x x x x";[/font]
- [font=Arial]timeout = 200;[/font]
- [font=Arial]stabdelay = 100;[/font]
- [font=Arial]cmdexedelay = 25;[/font]
- [font=Arial]synchloops = 32;[/font]
- [font=Arial]bytedelay = 0;[/font]
- [font=Arial]pollindex = 3;[/font]
- [font=Arial]pollvalue = 0x53;[/font]
- [font=Arial]predelay = 1;[/font]
- [font=Arial]postdelay = 1;[/font]
- [font=Arial]pollmethod = 0;[/font]
- [font=Arial]memory "flash"[/font]
- [font=Arial]size = 8192;[/font]
- [font=Arial]paged = no;[/font]
- [font=Arial]min_write_delay = 4000;[/font]
- [font=Arial]max_write_delay = 9000;[/font]
- [font=Arial]readback_p1 = 0xff;[/font]
- [font=Arial]readback_p2 = 0xff;[/font]
- [font=Arial]read = " 0 0 1 0 0 0 0 0",[/font]
- [font=Arial]" x x x a12 a11 a10 a9 a8",[/font]
- [font=Arial]" a7 a6 a5 a4 a3 a2 a1 a0",[/font]
- [font=Arial]" o o o o o o o o";[/font]
- [font=Arial]write = " 0 1 0 0 0 0 0 0",[/font]
- [font=Arial]" x x x a12 a11 a10 a9 a8",[/font]
- [font=Arial]" a7 a6 a5 a4 a3 a2 a1 a0",[/font]
- [font=Arial]" i i i i i i i i";[/font]
- [font=Arial]mode = 0x21;[/font]
- [font=Arial]delay = 12;[/font]
- [font=Arial];[/font]
- [font=Arial]memory "signature"[/font]
- [font=Arial]size = 3;[/font]
- [font=Arial]read = "0 0 1 0 1 0 0 0 x x x 0 0 0 a1 a0",[/font]
- [font=Arial]"0 0 0 0 0 0 0 0 o o o o o o o o";[/font]
- [font=Arial];[/font]
- [font=Arial]; [/font]
- [font=Arial]#------------------------------------------------------------
然后保存
现在就可以烧录AT89S52的单片机了,
例如我想烧录放在桌面上的编译好的跑马灯程序,
用命令
- sudo avrdude -p 8052 -c usbasp -e -U flash:w:'./跑马灯.hex'


